Wednesday, July 15, 2015

Perfect Fluffy & Moist Vanilla Cupcakes

I hate the word "moist." But I had to use it here, because no other word would convey the correct description of these tasty little cakes. I guess I could have called it "Perfect Fluffy & Not Dry Vanilla Cupcakes," but that just doesn't quite capture the texture of these beauties.


I love cakes and cupcakes that have a tender and moist crumb, while still being light and fluffy. That's a hard standard to live up to. But here they are: perfectly moist from-scratch basic vanilla cupcakes. It's the best, Jerry, the best! They have a great vanilla-y sweet flavor. And look how beautifully these babies rise and dome ever so slightly, just like a good cupcake should behave.
Small crumb that is light, while still being moist and tender


I won't tell you how many cupcakes I made and ate (and my family ate) in the attempt to create this recipe, mostly because I lost count. But I will tell you that I have eaten a lot of vanilla cupcakes. A lot, people.

The process of finding the perfect combination took a lot of tweaking of ingredients: amounts of sugar, amounts of liquid, whether or not to use butter, how to mix the ingredients, etc. Little variations changed the texture: from too moist, to rubbery, to too sweet,  to too large of a crumb, to a fine crumb, to finally: a moist and tender crumb with the right amount of sweetness, counterbalanced with the perfect amount of saltiness. I am finally satisfied.

Even though these little cakes don't have butter in them, they taste nice and buttery. Mmmm.


Today is my Grandma and Grandpa's 69th wedding anniversary. Sixty-nine years! Can you believe that? To help celebrate I made some of these vanilla cupcakes to share with them, family, and the staff and residents of their retirement home. Happy Anniversary Grandma and Grandpa!

Perfect Fluffy & Moist Vanilla Cupcakes

(makes 24 cupcakes)

3 cups cake flour
1 1/2 cups granulated sugar
1 1/2 tsp. baking soda
1 tsp. salt

3/4 cup whole milk
1 Tb. pure vanilla extract

1/2 cup sour cream

2 eggs
1/2 cup oil

1. Preheat oven to 350 degrees Fahrenheit and place rack in lower third of oven. Prepare 2, 12-each cupcake baking trays by lining them with cupcake liners (24).

2. In bowl of stand mixer (or regular medium bowl if you don't have a stand mixer), place the cake flour, sugar, baking soda, and salt together. Mix together on low speed for a minute or two until all the ingredients are well combined and the flour mixture is well aerated. 

3. Mix the milk and vanilla together in a liquid measuring cup or bowl.

4. In a separate bowl, whisk the eggs and oil together for a minute or two until the mixture is light yellow and thick. Gently whisk the sour cream into the eggs/oil. Gently pour in the vanilla/milk into the egg and sour cream mixture. Mix gently with whisk.

5. With the mixer on low speed, pour the liquid ingredients (they should all be combined now) slowly into the dry ingredients until well combined and smooth (about a minute or two).

6. Pour batter into cupcake liners in the baking trays until the liners are about 2/3 of the way full. Place baking trays in the oven and bake for 18-20 minutes, or until a toothpick inserted in the center comes out clean (or almost clean-maybe a moist crumb or two). Don't overbake.

7. Remove from oven and allow to cool on rack for a minute before removing cupcakes (in their liners) to fully cool on a cooling rack. Frost as desired when they are fully cool. Enjoy!!


UPDATE: If you want a cupcake with an even finer crumb and even more velvet texture....try this post here!


Wednesday, July 1, 2015

putting your ragdoll/softie together part 3: sewing limbs, stuffing and finishing

This post has been a long-time coming. My apologies! Today we are going to finish up making our rag dolls or giraffe; well later I'll post on making the yarn hair for the basic doll. We have already made a pattern (pattern making), cut out our pieces and sewed the head to the torso (part 1), and embroidered the face of the doll (part 2).

Now we're ready to sew the arms and legs, stuff them, attach them to the body and finish our doll!
we'll add some yarn hair to this doll in the next post
For the limbs of the basic doll above, you fold over your fabric (RST) so that it is doubled. Then trace the limbs on the folded fabric with a disappearing marker (I used pencil for the pictures here). Then I pin the fabric together and sew with a small stitch (1.6 on my machine) directly on the traced lines, leaving the base of the limbs unsewn so I can turn and stuff them later.
trace limb pattern on folded fabric

pin the fabric together

sew directly on traced lines with a tight stitch (I used 1.6 length)

limbs sewn
For the giraffe, we have to sew the felt (for the hooves) to the fabric for the rest of the limbs. I cut an 11 x 11 inch piece of cotton fabric for the arms/legs, and 2 pieces of felt measuring 2.75 x 11 inches. Then I pin the felt pieces to the fabric (one on top and one on bottom of arm fabric) like the picture below. I sew the felt on to the fabric where I've pinned, using 1/4 inch seam. Then press the seam and fold the fabric over in half (RST). Now I can trace my limb pattern pieces directly on the fabric and sew along my traced lines, leaving the base unsewn to turn and stuff.
for giraffe, pin felt strips to fabric to create the limb fabric
press the seams

fold the fabric in half, right sides together

line up the seams
trace pattern pieces on fabric

pin the fabric together

sew on traced lines, leaving base unsewn

sewn on the traced lines

cut out with pinking shears

Turn them right side out

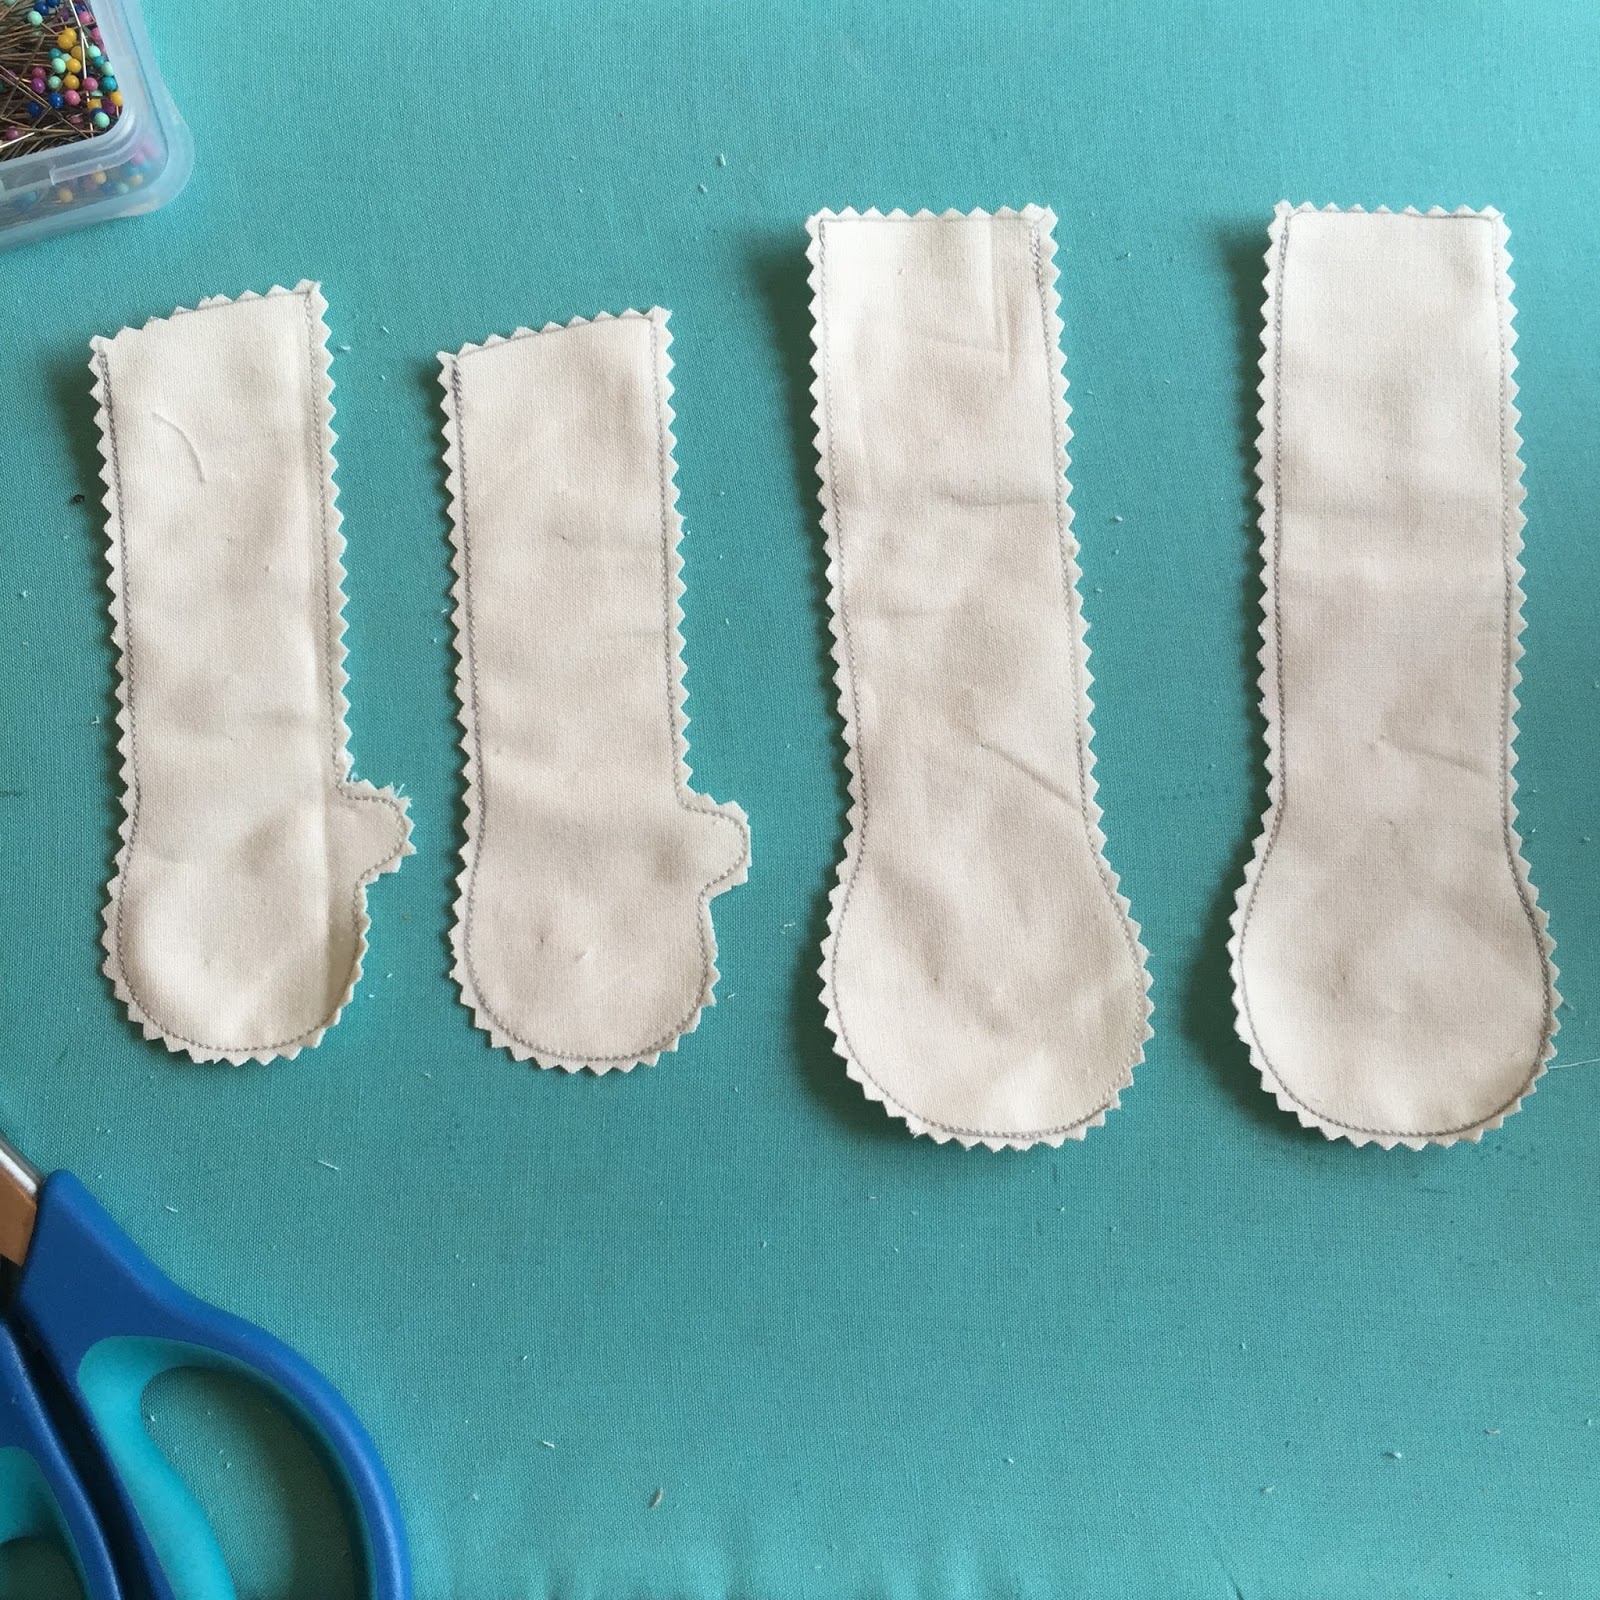
After the limbs are sewn, cut them out with pinking shears, or make little notches close to the stitches on the curves. Then turn and press them with an iron. I stuff them firmly then with small tufts of poly-fil stuffing, leaving about an inch unstuffed at the base. Leaving the base unstuffed will make it easier to sew it on with the machine later.
leave about 1/8th inch seam allowance and cut out notches with pinking shears

turn the limbs right-side-out and press them with iron

stuff the limbs with stuffing, leaving an inch unstuffed at base
With the limbs stuffed, we can now add them to the body. We're almost done. Exciting! Attach/pin the limbs to the front of your doll (with limbs going towards center of body) as shown in the photo below, then baste stitch them on to the front of the doll. I start with the arms and then attach the legs.
pin and sew the arms on to the front of body with the limbs toward the center of the doll

attach the legs in the same manner, with the legs going up towards the head
Here are some pics of the same procedure for the giraffe doll (attach the horns and ears to the head as shown):


With the limbs now attached to the doll, we can sew the back of the body on. On the wrong side of the back piece of the doll, I like to draw my seam allowance (1/4 inch) all the way around. This helps me sew more accurately around the curves. It comes in handy when sewing the more curvy giraffe pattern.
optional: draw a line for your seam allowance on the back of the doll piece. I leave a little more than 1/4 inch on the bottom where the legs will be attached. 
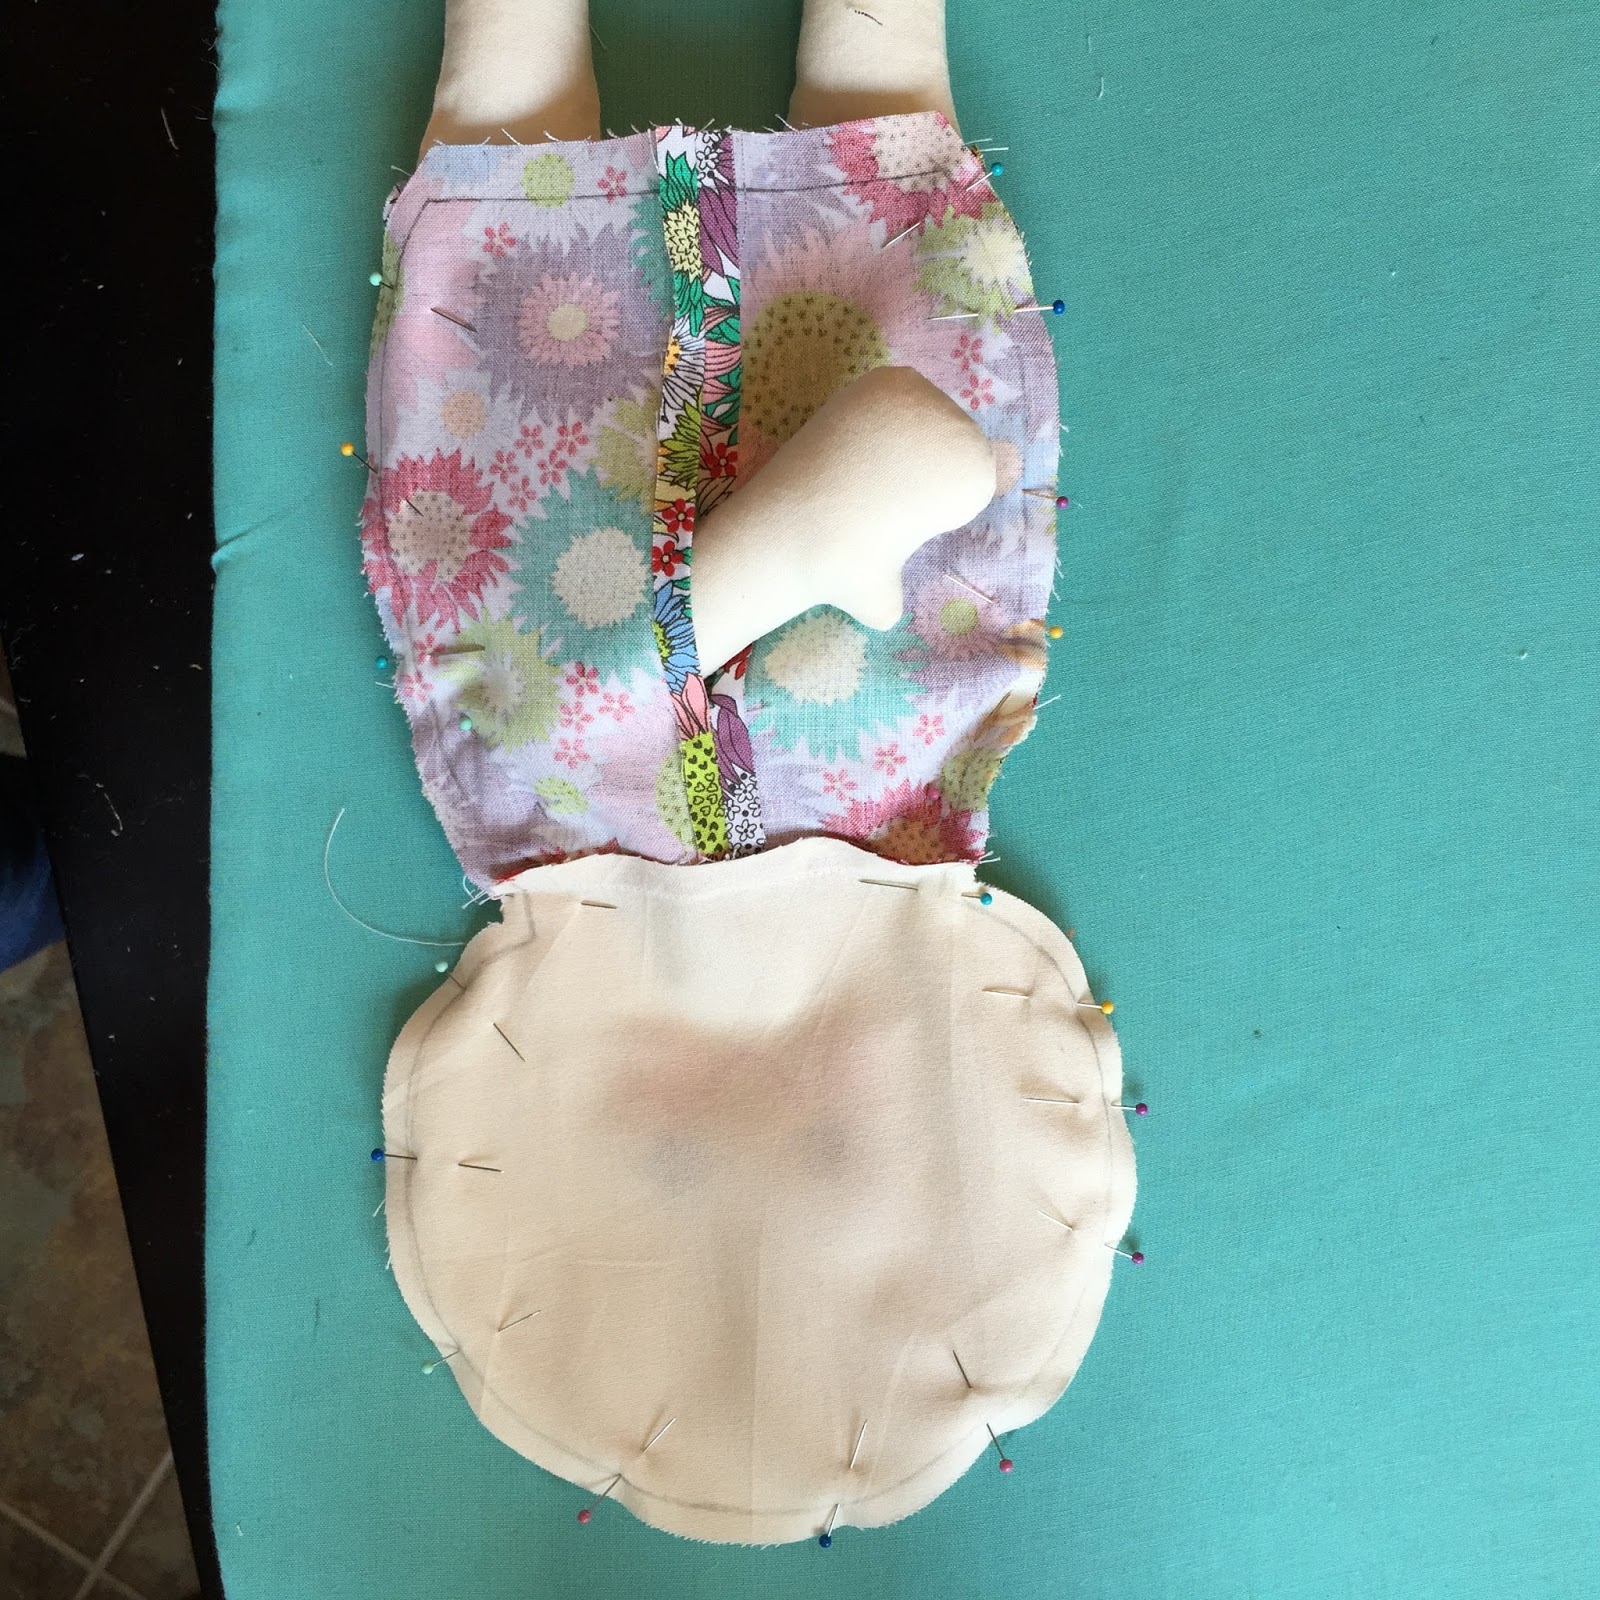
Now I pin the back of the body to the front (right sides together). I leave the legs out at first and don't sew that portion yet. If I pinned it all together at once, the fabric would get all distorted and would be difficult to sew. I stick one of the arms out of the little hole in the back to make the fabric lay more flat to sew. Then I sew from the base (near the legs) on one side--with my stitch length at 1.6--to the base of the other side near the other leg. I sew over again the portions where the arms are attached to make sure they are attached securely.
pin the front and back of doll together (RST) as shown
After that part is sewn, I stuff the arm back in the body, and fold the legs up inside the body (one is sticking out the back hole) and sew the base of the doll. I sew over the legs again as I did with the arms to make sure the legs stay securely attached.
sew the legs up inside the doll
BEFORE turning the doll right side out, it is very important to clip the curves and take a notch out at the neck close to the stitch so that it will lay right once it is right-side-out. I use sharp scissors for the triangle portion taken out of the neck, and use the pinking shears on the rest.
cut a triangle out of the seam at the neck. Use pinking shears to clip close to the stitches on rest of doll (see picture above).

With the curves notched and clipped, you can turn your doll right-side-out through the hole in the back. Ta-da!
doll turned right-side out
Now using tufts of poly-fil, stuff the head of the doll fairly firmly and work your way down to stuffing the body. Once the body is stuffed as firm as you'd like, you will hand sew the back of the doll using an "invisible" stitch (also known as the ladder stitch). This helps the seam lay nice and flat and it's hard to tell that you've hand-sewn the back shut. You can use a whip-stitch if you'd like, but that will show more. 
Pin the fabric together where you will hand stitch

the back all sewn up using the invisible ladder stitch
For the basic doll, you are all done (except the hair)!

For the giraffe, you will hand-sew in the tail (see how to make the pom-pom tail in this earlier post: pom pom tail for giraffe) at the base of the hole you are sewing up in the back. Now add a small amount of stuffing to the nose and hand stitch that up. And the giraffe is done!!
pom pom sewn in the base of the hole at the back of doll
Congratulations! Now go make another or two. Or experiment with making more patterns of your own. It's fun.
Ta da!

Tuesday, June 30, 2015

Solar Baking: hot stuff!

There is a projected high of 108 degrees for today and tomorrow where I live. Yikes!! As you can imagine, this poses a problem for someone who loves to bake. Well, it poses a problem for people who don't want to melt and die in the heat too.

But when it comes to baking: who wants to turn on an oven when your AC is running full blast all day? And it's already as hot as an oven outside? So what do you do if you just gotta bake?

Well, you first ask your husband if he'd be willing to put some cookie dough on a cookie sheet and leave it on the dashboard of his car while he is at work. Just for an experiment, ya know. Cookies after work: yay! He doesn't seem too keen on that idea, though. So what's a baker to do?

You think: 'I live in one of the hottest places ever; there's gotta be a way to bake something with the sun.' So you google "solar ovens" and do some reading and looking at pictures. You get bored with all the talk of conduction, convection, and radiation. Then you pick a model (I chose the box cooker with some reflective panels) and get some supplies and hope for the best!


Now I don't pretend to be an expert on solar ovens, but this one worked great for me. It got hot enough in the late afternoon (after I made it) and baked up some good rolls. It took me about two hours to put together (while the little one was napping), and only required a few supplies.

Here is what I used:

  • Two cardboard boxes, one slightly larger than the other 
  • Utility knife
  • large picture frame with glass in it (for lid/door)
  • Crumpled newspaper/scratch paper/wrapping paper, etc. to use as insulation
  • Duct tape (use the extra sticky kind---I learned that the hard way)
  • White foam board (4 large pieces)--can also use cardboard
  • Black foam board for inside (can also paint inside black or use black construction paper)
  • Glue
  • Aluminum foil
  • Oven thermometer to test temperature of oven
Step 1: get your frame with glass. 

You want to get the frame first as you will get boxes based on the size of your frame. I went to Goodwill (a thrift store) and for $5 picked up this beauty. Ha ha ha ha. I just needed the frame and the glass, not the scantily clad redhead with her bum doused in spirits and lit on fire. But I was amused. And I am a redhead. When I sent a pic of my find to my husband, he was worried that I was going to try to  hang it up somewhere in our home. Hee hee.

You can also use plastic wrap if you don't want to go through this step. 
Whoa!
"I'm just gonna sit here seductively in this alcohol until the match burns down and my bum explodes"


Step 2: get and set up your boxes

I went to Walmart and found some boxes that would work with the frame (meaning the frame would rest on top of the smaller one, so it has to be at least as big as the opening in the smaller box).

I set up the smaller box, taped the bottom and cut off the flaps (carefully with the utility knife) that would make up the top. Then with black foam board I found at the dollar store, I lined the inside (glued in the foam board). You can also paint it black and allow it to dry.
I used 2 foam boards, but recommend getting 3 if using them. 

I completely set up the second box (meaning I taped up the top and bottom with nothing inside). Then I cut out a square hole (the size of the smaller box) in one of the sides of the larger box. I added some insulation (I used Christmas wrapping paper since I didn't have newspapers) in between the two boxes. I taped the boxes together on top with some more duct tape.
smaller box inside larger box, and then taped together

 Step 3: put on the lid

Then I took the sexy red-head out of her frame and taped the frame and glass on the box over the hole.
I taped the outside of the frame, and then taped it to the box from the inside as well. Here is where you don't want to have cheap duct tape. After being in the sun for about a half hour, the original duct tape I used melted off and I had to re-tape the frame/door on.
I taped it so that it could still open (like a hinge there at the back)
 Step 4: make and attach the reflective panels.

I had 4 white foam boards from the dollar store. I measured the lengths of the frame and added an inch or so to the measurement. I used that number as the length of the base of the reflectors. Then I made sure they flared out from the base. Like the picture below. The top and bottom pieces are identical, and the sides are identical to each other.
I didn't take picture of me cutting the foam board; sorry
Then I glued aluminum foil to the foam board. Then I taped three of the reflectors together (the top and sides) with clear packing tape on both sides, and taped them on the box. I attached the bottom panel to the box along the bottom, but not to the other side panels as I need it to move/adjust as I tilt the oven towards the sun. 

Step 5: place your oven in the sun, angled so that it is directly in the line of the sun. Prop it up with something (like a food can or box or whatever). Prop it up underneath and behind (I didn't prop it up behind here and the wind knocked it over and my rising rolls got smooshed--sad).
Prop it up from behind too so the wind doesn't knock it over


During baking, you will have to rotate the oven every 30-45 minutes or so as the sun moves. Place the oven thermometer in the oven, and a small rack if wanted (I found a small rack at the dollar store). 

The temperature was at 200 degrees Fahrenheit after only 15 minutes. It got up to 250 pretty quickly after that. Then the duct tape melted in the sun and the lid came off, and the temp went back down to 150 degrees. I taped it back on with better tape. 

Then I put some little teeny bread loaves in there to test it. Do you see them rising in there? Awesome, huh?
rolls rising quite well; right before the wind knocked the oven over and smooshed them. Sad
The rolls took longer to bake than they would have in a regular oven, but that was fine with me because I didn't heat up my house. 

Make sure you use oven mitts when touching this oven to rotate it or get the food out. It gets quite hot!

Next I'm going to experiment with brownies and cookies. And then maybe even a roast or something in a covered pot if I get brave. 

So I would say the solar baking experiment was a success! Smooshed rolls and all.

My neighbor did think I was a little weird, though. She couldn't understand why I would want to do such a thing as make a solar oven and cook with it. 
you can see that even though I smooshed them,  they still rose some more and the back loaves were not affected. 
Why? Because look what a cool thing I just did! I combined my love of baking and making/crafting in one project. I baked bread without turning on my oven! In a solar oven I built all by myself (now I kind of sound like the Little Red Hen...). Without electricity and without gas. And now you can too. 

Now where do I store this thing?

Tuesday, June 16, 2015

Chocolate Peanut Butter Cookie Dough Ice Cream

My family loves ice-cream. That's an understatement. They're obsessed with ice cream.

I grew up in a home where there was an ice-cream parlor in the basement. A bona-fide ice-cream parlor with a marble bar, brass foot railings, upholstered white-painted iron bar stools, a copper sink, built-in ice cream maker, and a spittoon.

What is a spittoon? Google it. Grody. It is just for looks (the spittoon), and has never been used. But since my brother's bedroom was also in the basement, I guess I can't guarantee that it has never been used...

Anyway, behind the marble counter of the ice cream bar is a red brick wall. And in the middle of the brick wall is a stained-glass window designed and made by my father. It displays our family's name and has a beautiful stained glass ice-cream sundae in the middle of it: complete with glass renditions of hot fudge and a cherry on top.

So what's the deal? Why did every kid think I had the coolest basement ever (it even has an old-fashioned telephone booth in it, you guys!)?

Because my family is genetically and conditionally truly obsessed with ice-cream! That's why. We had it as an option almost every night for dessert. Our freezers (yes, plural..as in more than one; more than two, actually) were continually stocked with it.

When Thrifty's had a sale on ice cream, WATCH OUT! We were accustomed to the stares from the grocery clerk(s) as we checked out. 20 cartons of ice-cream? No, we're not having a party. Unless you count ice-cream party every night at our house !!! Woot woot!

My dad's running joke when we (spoiled ice-cream parlor-in-the-house kids that we were) asked what flavors of ice cream we had in our freezers, was: "Prune Ripple." One of these days, you will see a post on here on how to make Prune Ripple Ice cream. Some day. But not today.

Today you understand my love for ice-cream. My snobby desire for high quality, high-butterfat creamy delicious and velvety smooth ice-cream. It's not my fault. I grew up with an ice-cream parlor.

Do I still have ice cream almost every night? No...I don't have the desire for it every night. But when I do, that snobbery kicks in and I want only the good stuff. So, my friends, I share with you a delicious recipe for the good stuff.

Chocolate Peanut Butter Cookie Dough Ice-Cream.


This is a dark chocolate-based ice cream with an intense chocolate flavor, laden with chewy chunks of glorious peanut butter chocolate chip cookie-dough. If you are a chocolate and peanut butter fan, you are in luck! If you are a cookie dough fan, you're in even more luck. It's the best of the two worlds combined.

This recipe calls for making a custard (it contains five egg yolks), and so this is the creamiest, richest ice cream I have had. And from my story above, you can tell that that's saying something.

It's not difficult to make, and once you have made it and tasted it, you will be converted into an ice-cream snob too. I welcome you with open arms. And I'm sorry. I'm sorry you will never be satisfied by cheap air-filled, xantham gum-containing ice-cream again.

Or maybe you will. I am being a little dramatic. Seriously, though: are you ready for this? Let's do it!

Chocolate Peanut Butter Cookie Dough Ice Cream

(ice-cream recipe adapted from recipe of David Lebovitz)
Ingredients
2 cups heavy cream
3 tablespoons unsweetened cocoa powder, preferably Dutch-processed
1 scant cup of semi-sweet high-quality chocolate chips
1 1/4 cup whole milk
3/4 cup sugar
1/8 tsp. salt
5 large egg yolks
1 tsp. vanilla extract

Peanut Butter Chocolate Chip Cookie Dough
1/2 cup butter, room temperature
1/2 cup creamy peanut butter (I used Jif)
1/2 cup granulated sugar
1/2 cup brown sugar
1/4 cup pasteruized eggs (or egg whites, or egg beaters)
1/2 tsp. vanilla extract
1 1/4 cup all-purpose flour
1/2 tsp baking soda 
pinch of salt
1 cup mini semi-sweet chocolate chips

additional flour to dust cookie dough balls with before freezing

Directions

1. Place the unsweetened cocoa powder and 1 cup of the heavy cream in a saucepan over medium heat and whisk constantly to combine. Bring the mix to a soft boil and boil for 30 seconds while stirring. Remove from the heat and add the semi-sweet chocolate chips. Stir until the chocolate is melted and the mixture is smooth. Add the other cup of heavy cream and stir until combined. Pour the chocolate mix into a medium bowl and scrape the pan thoroughly; place a strainer over the top of the bowl.

2. In the same sauce pan (meaning you don't have to clean it. yay!) warm the milk, sugar, and salt until hot. Whisk the egg yolks together in a separate medium bowl. Slowly pour the warm milk into the egg yolks while whisking constantly. Scrape the warmed egg yolks back into the sauce pan. 

3. Stir continuously over medium heat with a heat-proof spatula. Stir until the mixture thickens and coats the spatula (about 170 degrees F). This will take about 5 minutes. Pour this custard into the strainer (over the chocolate bowl). Stir until smooth, and stir in the vanilla.  Place the bowl in an ice bath and continue to stir until the mixture is cool. Place the mixture in the refrigerator and allow to chill for at least 8 hours. 

4. Make the cookie dough: Cream the butter and peanut butter together with a mixer until smooth and light. Add the sugars and beat again. Add the pasteurized liquid eggs/whites and vanilla and mix again until combined. Add the flour, baking soda, salt and combine. Stir in the chocolate chips.

5. With a small spoon, dish out small portions of the dough (however large you want the dough bites to be in your ice cream), roll quickly in your hands into a ball, and throw into a bowl with some flour in it. Repeat until you use about 2/3 of the dough. Place the flour-coated little dough balls in a freezer bag and in the freezer until you are ready to use them. I baked the rest of my cookies at 350 for about 12 minutes. Because there is pasteurized egg and a small amount of baking soda, they can actually bake up like a normal cookie. 

6. Freeze the ice cream/custard in your ice cream maker according to the manufacturer's instructions. Once the ice cream is done churning, scrape it into a container and fold in the frozen cookie dough balls (you can add as much as you like, but I used about 1/2 of them and saved the rest for another batch. I even had some leftover dough to make a few cookies). Place in the freezer to harden for at least 8 hours. 


7. EAT!

As a side note, the few cookies I baked from this dough were amazing. I now have a new peanut-butter chocolate chip cookie dough recipe.

Enjoy this yummy ice-cream, and it's lucky that you'll have some extra cookie dough niblets on-hand for that mandatory second batch of ice cream. Trust me: you will be making this again.