Tuesday, June 30, 2015

Solar Baking: hot stuff!

There is a projected high of 108 degrees for today and tomorrow where I live. Yikes!! As you can imagine, this poses a problem for someone who loves to bake. Well, it poses a problem for people who don't want to melt and die in the heat too.

But when it comes to baking: who wants to turn on an oven when your AC is running full blast all day? And it's already as hot as an oven outside? So what do you do if you just gotta bake?

Well, you first ask your husband if he'd be willing to put some cookie dough on a cookie sheet and leave it on the dashboard of his car while he is at work. Just for an experiment, ya know. Cookies after work: yay! He doesn't seem too keen on that idea, though. So what's a baker to do?

You think: 'I live in one of the hottest places ever; there's gotta be a way to bake something with the sun.' So you google "solar ovens" and do some reading and looking at pictures. You get bored with all the talk of conduction, convection, and radiation. Then you pick a model (I chose the box cooker with some reflective panels) and get some supplies and hope for the best!


Now I don't pretend to be an expert on solar ovens, but this one worked great for me. It got hot enough in the late afternoon (after I made it) and baked up some good rolls. It took me about two hours to put together (while the little one was napping), and only required a few supplies.

Here is what I used:

  • Two cardboard boxes, one slightly larger than the other 
  • Utility knife
  • large picture frame with glass in it (for lid/door)
  • Crumpled newspaper/scratch paper/wrapping paper, etc. to use as insulation
  • Duct tape (use the extra sticky kind---I learned that the hard way)
  • White foam board (4 large pieces)--can also use cardboard
  • Black foam board for inside (can also paint inside black or use black construction paper)
  • Glue
  • Aluminum foil
  • Oven thermometer to test temperature of oven
Step 1: get your frame with glass. 

You want to get the frame first as you will get boxes based on the size of your frame. I went to Goodwill (a thrift store) and for $5 picked up this beauty. Ha ha ha ha. I just needed the frame and the glass, not the scantily clad redhead with her bum doused in spirits and lit on fire. But I was amused. And I am a redhead. When I sent a pic of my find to my husband, he was worried that I was going to try to  hang it up somewhere in our home. Hee hee.

You can also use plastic wrap if you don't want to go through this step. 
Whoa!
"I'm just gonna sit here seductively in this alcohol until the match burns down and my bum explodes"


Step 2: get and set up your boxes

I went to Walmart and found some boxes that would work with the frame (meaning the frame would rest on top of the smaller one, so it has to be at least as big as the opening in the smaller box).

I set up the smaller box, taped the bottom and cut off the flaps (carefully with the utility knife) that would make up the top. Then with black foam board I found at the dollar store, I lined the inside (glued in the foam board). You can also paint it black and allow it to dry.
I used 2 foam boards, but recommend getting 3 if using them. 

I completely set up the second box (meaning I taped up the top and bottom with nothing inside). Then I cut out a square hole (the size of the smaller box) in one of the sides of the larger box. I added some insulation (I used Christmas wrapping paper since I didn't have newspapers) in between the two boxes. I taped the boxes together on top with some more duct tape.
smaller box inside larger box, and then taped together

 Step 3: put on the lid

Then I took the sexy red-head out of her frame and taped the frame and glass on the box over the hole.
I taped the outside of the frame, and then taped it to the box from the inside as well. Here is where you don't want to have cheap duct tape. After being in the sun for about a half hour, the original duct tape I used melted off and I had to re-tape the frame/door on.
I taped it so that it could still open (like a hinge there at the back)
 Step 4: make and attach the reflective panels.

I had 4 white foam boards from the dollar store. I measured the lengths of the frame and added an inch or so to the measurement. I used that number as the length of the base of the reflectors. Then I made sure they flared out from the base. Like the picture below. The top and bottom pieces are identical, and the sides are identical to each other.
I didn't take picture of me cutting the foam board; sorry
Then I glued aluminum foil to the foam board. Then I taped three of the reflectors together (the top and sides) with clear packing tape on both sides, and taped them on the box. I attached the bottom panel to the box along the bottom, but not to the other side panels as I need it to move/adjust as I tilt the oven towards the sun. 

Step 5: place your oven in the sun, angled so that it is directly in the line of the sun. Prop it up with something (like a food can or box or whatever). Prop it up underneath and behind (I didn't prop it up behind here and the wind knocked it over and my rising rolls got smooshed--sad).
Prop it up from behind too so the wind doesn't knock it over


During baking, you will have to rotate the oven every 30-45 minutes or so as the sun moves. Place the oven thermometer in the oven, and a small rack if wanted (I found a small rack at the dollar store). 

The temperature was at 200 degrees Fahrenheit after only 15 minutes. It got up to 250 pretty quickly after that. Then the duct tape melted in the sun and the lid came off, and the temp went back down to 150 degrees. I taped it back on with better tape. 

Then I put some little teeny bread loaves in there to test it. Do you see them rising in there? Awesome, huh?
rolls rising quite well; right before the wind knocked the oven over and smooshed them. Sad
The rolls took longer to bake than they would have in a regular oven, but that was fine with me because I didn't heat up my house. 

Make sure you use oven mitts when touching this oven to rotate it or get the food out. It gets quite hot!

Next I'm going to experiment with brownies and cookies. And then maybe even a roast or something in a covered pot if I get brave. 

So I would say the solar baking experiment was a success! Smooshed rolls and all.

My neighbor did think I was a little weird, though. She couldn't understand why I would want to do such a thing as make a solar oven and cook with it. 
you can see that even though I smooshed them,  they still rose some more and the back loaves were not affected. 
Why? Because look what a cool thing I just did! I combined my love of baking and making/crafting in one project. I baked bread without turning on my oven! In a solar oven I built all by myself (now I kind of sound like the Little Red Hen...). Without electricity and without gas. And now you can too. 

Now where do I store this thing?

Tuesday, June 16, 2015

Chocolate Peanut Butter Cookie Dough Ice Cream

My family loves ice-cream. That's an understatement. They're obsessed with ice cream.

I grew up in a home where there was an ice-cream parlor in the basement. A bona-fide ice-cream parlor with a marble bar, brass foot railings, upholstered white-painted iron bar stools, a copper sink, built-in ice cream maker, and a spittoon.

What is a spittoon? Google it. Grody. It is just for looks (the spittoon), and has never been used. But since my brother's bedroom was also in the basement, I guess I can't guarantee that it has never been used...

Anyway, behind the marble counter of the ice cream bar is a red brick wall. And in the middle of the brick wall is a stained-glass window designed and made by my father. It displays our family's name and has a beautiful stained glass ice-cream sundae in the middle of it: complete with glass renditions of hot fudge and a cherry on top.

So what's the deal? Why did every kid think I had the coolest basement ever (it even has an old-fashioned telephone booth in it, you guys!)?

Because my family is genetically and conditionally truly obsessed with ice-cream! That's why. We had it as an option almost every night for dessert. Our freezers (yes, plural..as in more than one; more than two, actually) were continually stocked with it.

When Thrifty's had a sale on ice cream, WATCH OUT! We were accustomed to the stares from the grocery clerk(s) as we checked out. 20 cartons of ice-cream? No, we're not having a party. Unless you count ice-cream party every night at our house !!! Woot woot!

My dad's running joke when we (spoiled ice-cream parlor-in-the-house kids that we were) asked what flavors of ice cream we had in our freezers, was: "Prune Ripple." One of these days, you will see a post on here on how to make Prune Ripple Ice cream. Some day. But not today.

Today you understand my love for ice-cream. My snobby desire for high quality, high-butterfat creamy delicious and velvety smooth ice-cream. It's not my fault. I grew up with an ice-cream parlor.

Do I still have ice cream almost every night? No...I don't have the desire for it every night. But when I do, that snobbery kicks in and I want only the good stuff. So, my friends, I share with you a delicious recipe for the good stuff.

Chocolate Peanut Butter Cookie Dough Ice-Cream.


This is a dark chocolate-based ice cream with an intense chocolate flavor, laden with chewy chunks of glorious peanut butter chocolate chip cookie-dough. If you are a chocolate and peanut butter fan, you are in luck! If you are a cookie dough fan, you're in even more luck. It's the best of the two worlds combined.

This recipe calls for making a custard (it contains five egg yolks), and so this is the creamiest, richest ice cream I have had. And from my story above, you can tell that that's saying something.

It's not difficult to make, and once you have made it and tasted it, you will be converted into an ice-cream snob too. I welcome you with open arms. And I'm sorry. I'm sorry you will never be satisfied by cheap air-filled, xantham gum-containing ice-cream again.

Or maybe you will. I am being a little dramatic. Seriously, though: are you ready for this? Let's do it!

Chocolate Peanut Butter Cookie Dough Ice Cream

(ice-cream recipe adapted from recipe of David Lebovitz)
Ingredients
2 cups heavy cream
3 tablespoons unsweetened cocoa powder, preferably Dutch-processed
1 scant cup of semi-sweet high-quality chocolate chips
1 1/4 cup whole milk
3/4 cup sugar
1/8 tsp. salt
5 large egg yolks
1 tsp. vanilla extract

Peanut Butter Chocolate Chip Cookie Dough
1/2 cup butter, room temperature
1/2 cup creamy peanut butter (I used Jif)
1/2 cup granulated sugar
1/2 cup brown sugar
1/4 cup pasteruized eggs (or egg whites, or egg beaters)
1/2 tsp. vanilla extract
1 1/4 cup all-purpose flour
1/2 tsp baking soda 
pinch of salt
1 cup mini semi-sweet chocolate chips

additional flour to dust cookie dough balls with before freezing

Directions

1. Place the unsweetened cocoa powder and 1 cup of the heavy cream in a saucepan over medium heat and whisk constantly to combine. Bring the mix to a soft boil and boil for 30 seconds while stirring. Remove from the heat and add the semi-sweet chocolate chips. Stir until the chocolate is melted and the mixture is smooth. Add the other cup of heavy cream and stir until combined. Pour the chocolate mix into a medium bowl and scrape the pan thoroughly; place a strainer over the top of the bowl.

2. In the same sauce pan (meaning you don't have to clean it. yay!) warm the milk, sugar, and salt until hot. Whisk the egg yolks together in a separate medium bowl. Slowly pour the warm milk into the egg yolks while whisking constantly. Scrape the warmed egg yolks back into the sauce pan. 

3. Stir continuously over medium heat with a heat-proof spatula. Stir until the mixture thickens and coats the spatula (about 170 degrees F). This will take about 5 minutes. Pour this custard into the strainer (over the chocolate bowl). Stir until smooth, and stir in the vanilla.  Place the bowl in an ice bath and continue to stir until the mixture is cool. Place the mixture in the refrigerator and allow to chill for at least 8 hours. 

4. Make the cookie dough: Cream the butter and peanut butter together with a mixer until smooth and light. Add the sugars and beat again. Add the pasteurized liquid eggs/whites and vanilla and mix again until combined. Add the flour, baking soda, salt and combine. Stir in the chocolate chips.

5. With a small spoon, dish out small portions of the dough (however large you want the dough bites to be in your ice cream), roll quickly in your hands into a ball, and throw into a bowl with some flour in it. Repeat until you use about 2/3 of the dough. Place the flour-coated little dough balls in a freezer bag and in the freezer until you are ready to use them. I baked the rest of my cookies at 350 for about 12 minutes. Because there is pasteurized egg and a small amount of baking soda, they can actually bake up like a normal cookie. 

6. Freeze the ice cream/custard in your ice cream maker according to the manufacturer's instructions. Once the ice cream is done churning, scrape it into a container and fold in the frozen cookie dough balls (you can add as much as you like, but I used about 1/2 of them and saved the rest for another batch. I even had some leftover dough to make a few cookies). Place in the freezer to harden for at least 8 hours. 


7. EAT!

As a side note, the few cookies I baked from this dough were amazing. I now have a new peanut-butter chocolate chip cookie dough recipe.

Enjoy this yummy ice-cream, and it's lucky that you'll have some extra cookie dough niblets on-hand for that mandatory second batch of ice cream. Trust me: you will be making this again.

Thursday, June 11, 2015

Skirt and toy making

I have been busy this week trying to stock the etsy shop, so I haven't had lots of time to post. Although I have made some delicious ice-cream that will be an upcoming post. Yum.

But I thought I'd share what I've been up to. I have made some cute skirts for my girls to wear. I followed this awesome blog here from Larissa Holland on making this cute three-tiered ruffle skirt. I modified it of course for the little one.
These should come in handy on July 4th
They were easy and fun to make, and didn't take too much time (score). I bought a ruffler foot (which I had not heard of before) to be able to do this project.

I bought this one here. Even though my machine is not a singer, this foot still worked on my machine. It was the cheapest option too. Thanks to good ol' amazon for our prime shipping, I was ruffling the layers in no time.

And thanks to Larissa from mmmcrafts for telling me to rip my fabric on the grain instead of cutting. It really did save a lot of time and made this skirt fairly quick to make.

I've had fun ruffling things. I added a rag doll to my toy making with a cute little ruffled skirt.


The toys in my etsy shop I've been working on
So I've been sewing skirts and toys this week. Fun stuff!


Monday, June 1, 2015

Fresh Pasta with Browned-Butter Basil Lemon Sauce

Now that's a mouthful! This past weekend, I purchased two large bunches of fresh basil to add to the Italian sausage marinara sauce I made to go with a pasta dinner we had for a church dinner. Basil is my most favorite herb. I love the stuff.

Then, in the evening, I watched a Netflix documentary called "Chef's Table." The first episode was about an Italian chef and his restaurant and life with his family in Modena, Italy. Italian food is my favorite. Watching some of the chefs in his restaurant rolling out the fresh pasta by hand reminded me that making fresh pasta is not too hard, and the results are delicious.

With my left-over fresh basil and the documentary as my inspiration, I decided to make some fresh pasta with a delicious browned butter sauce, adding a touch of lemon (from the lemons in my parent's yard), a touch of cream (leftover from all the cake baking and frosting making as of late), and all that delicious fresh basil.

Making the fresh pasta dough is not difficult, and the hand-kneading is strangely satisfying. When you're done hand kneading, you have produced a very smooth, satiny and supple dough. It feels great in your hands.

The dough just takes a few ingredients (flour, eggs, olive oil and a pinch of salt) which most people have on hand. I also happened to add a Tbsp of gluten (because I have that on hand, and I was trying to add more protein to my flour to make it more similar to semolina flour--high protein flour-- that pasta is traditionally made of). I guess I could have used bread flour instead of all-purpose too. I kneaded my dough for about ten minutes to get that smooth, satiny dough. I then formed it into a disk, wrapped it up tight in plastic wrap, and stuck it in the fridge for about an hour and a half. You're supposed to leave it in the fridge for at least an hour.

There are plenty of recipes for fresh pasta on the Internet; I tried this one from Anne Burrell, but modified it by adding a Tbsp. of the gluten powder as previously stated. I wanted a nice al-dente pasta with a toothsome bite to it. It is not noted in her recipe, but in making pasta, the eggs should not be straight from the fridge. They should be room temp, or if you're like me and don't want to wait for them to come to room temp, you can put them in a bowl of warm water for a minute or two.

My sweet hubby gave me a pasta roller as a gift a few years ago, so I hauled it off the pantry shelf and put it to work. I rolled it out to the number 6 thickness setting, and using the attachment the pasta roller comes with, I cut it into linguini noodles. I used the fresh pasta (meaning I didn't dry it) in making this, but I had enough pasta to dry some for later. I also froze some little nests of fresh pasta for later too. I guess I like experimenting.
The dough after it has rested in the fridge
Cutting off a managable size of pasta dough

that small hunk of dough rolled through machine on each setting (starting at 0, then 1, 2 etc.) until I get to "6" on the machine; then I place it in the cutting roller of the machine to make the linguine noodles


little pile of fresh pasta ready to be cooked

If you don't want to go to the trouble of making fresh pasta (which you really should try at least once), go ahead and used packaged pasta. This sauce is delicious and might just have you licking your plate at the end of dinner.

You should use about a half a pound to 3/4 pound of fresh pasta for this recipe of sauce, and that should feed about 4-5 people. The sauce is fresh and zesty from the lemon and fresh basil. It is rich in flavor without being heavy. The saltiness of the Parmesan cheese perfectly seasons the pasta and the browned butter leaves a subtle nutty flavor. When my pasta was gone (and all too soon I might add), I wiped my bowl clean with my broccoli. Not quite my finger...I was trying to have some semblance of sophistication. My daughter, however, licked her toes, not her fingers. Oh to have the flexibility of a two year old.


I already can't wait to make this again. It will definitely be a staple this summer. That's when that frozen pasta will come in handy.

The pasta will only take a minute or two to cook once the salted water is boiling, so make the sauce first. But make sure you have your salted water boiling so the noodles cook quickly and the sauce doesn't get cold before you toss the noodles with the sauce.

Browned-Butter Basil Lemon Sauce

1 stick (1/2 cup) butter
2 Tbsp. extra virgin olive oil
1/2 tsp. kosher salt
1 Tbsp. minced shallot (or onion)
3 Tbsp. heavy cream
1-2 Tbsp. fresh basil, cut into thin strips


lay a stack of basil leaves on top of each other

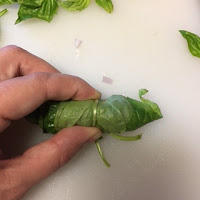
roll the stack of basil leaves up

slice thin strips off the roll of basil leaves

1 tsp. lemon zest
1 Tbsp. lemon juice

1/2 cup (or more to taste) grated parmigiano-reggiano cheese
more basil to garnish

Directions
1. Place the butter, olive oil and salt in a saucepan over medium-low heat. Cook until the butter melts. 

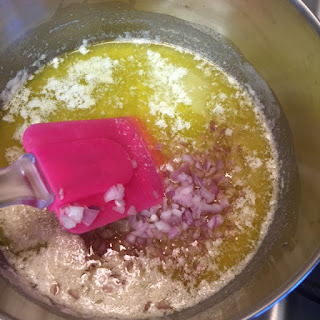
2.Then add the minced shallots. Cook the shallots in the butter mixture until soft. Add the basil. 


4. Cook and stir until the butter begins to brown (about five minutes). It might get a little foamy while cooking. This is normal; turn down the heat if it gets too foamy. After the butter mixture is light brown, remove from the heat. 
the butter has turned a toasty brown and smells faintly nutty


5. Stir in the cream, lemon zest and lemon juice. Toss the sauce with the cooked pasta, adding the Parmigiano-Reggiano cheese and additional basil while tossing. Serve immediately. 


toss the noodles, sauce, cheese, and extra basil with tongs

EAT!!

This definitely satisfied my craving for fresh delicious pasta with a tangy, flavorful rich but light sauce. I don't know if I should use the word "satisfied" though, as I'm already looking forward to my next bowl-full. Let's say that it satisfied my craving, but created a monster of new future cravings. Yup, that fits.

Enjoy!