Wednesday, July 25, 2018

Disneyland White Chocolate Raspberry Cookies

First off, I know it has literally been years since I have posted anything. HOWEVER, and this is a big however, I NEEDED to post this recipe. Mostly because of all the blood, sweat, and tears that went into creating it (note: do not take me literally here. There is no blood in these cookies. And any tears that may have fallen in are only tears of joy as I realized how close these cookies are to the real deal, and as far as sweat....well, I'll let you decide). If you don't care about how I ended at this recipe, just scroll to the bottom for the actual recipe, but don't forget to read the tips, as they're important to making the cookies successfully.


My husband is a little obsessed with Disneyland. If you know him, you know how much random trivia he knows about the place. And because of this, some of this knowledge has trickled down to me. What's so great about July 17, 1955? Anyone? Anyone? You're going to have to google it.

Anyway, for the past few years, Disneyland is where our family has spent our family vacations together. Yes it is hot during Summer, and yes it is crowded, and yes it is overpriced. But it IS a magical place and with the ages of our children, and my husband's undying love and allegiance, it works well for all of us. It is also a magical place to get treats (which is just as exciting for me as going on the rides....oh, and of course seeing my kids happy. That too. Don't forget that).

One of the treats I had heard about (and then, of course, read about on the Internet) was the large white chocolate raspberry cookies that you can find at the park. Apparently, people love these things. So last year, I bought my first one. To be honest, I think the one I bought was stale. My husband (lover of all things Disneyland and white chocolate too) loved it. I saved part of my cookie (weird, I know) to come home and try to re-create the recipe. Because if you know me, you know I have my own obsession with cookies, and I like trying to figure out recipes. It's almost like I can't rest until I figure it out.


So during the hottest weeks of the year in 2017, immediately after our family trip, I took to turning my oven on for hours at a time and re-creating the recipe (which included analyzing the color, texture, and consistency of the small bite I had brought home with me--I made a mental note to bring home an entire cookie at some other point). And then today, the day after our most recent trip, I decided it was time to make them again and post them. Especially since I brought home an entire cookie this time.
Actual Disneyland Cookie I bought yesterday

inside of actual Disneyland cookie

Of course, there are already lots of copycat recipes of this cookie on the Internet and Pinterest, but in looking the recipes over and examining the pictures, none of them seemed to actually look like the cookies found in the park. I'm sure they are still good and delicious cookies; I was just looking to recreate as close to a replica as I could to the cookie. In my searching, I came across the knowledge that the cookies in Disneyland are actually made by a company called Selma's. So I perused their website, looked over the ingredients that they had listed in their cookies, and went to work.
Side-by-side comparison of my cookie vs. the one from D-land. Mine is on the right. It is slightly smaller (but you could adjust the recipe to make 8 instead of 9 cookies and it would be same size--or use a larger scoop)
I noticed that their cookies had powdered sugar in them instead of granulated sugar, which was interesting to me. I don't know if it makes a difference, but I used C&H brand powdered sugar in the recipe. Also, as a commercial bakery, Selma's recipe uses hydrogenated palm oil, which I wasn't going to be able to use. I experimented with coconut oil (melted), butter, melted butter, and canola oil. And the one that worked the best for the texture was the canola oil. So a cookie with powdered sugar and canola oil. Who knew? This was different than any other cookie I'd made before. (*update: you can make these with shortening as well--which is hydrogenated oil like a bakery would use. That option is listed in recipe below as well).
These are the notes on the different variations I tried (there is also writing on the backs of the papers)
So, I won't go too much more into detail about my experimenting, other than to say I got pretty good at splitting an egg in half (yolk included) so that I didn't have to make (and waste ingredients if I didn't have to) full batches of cookies that I wasn't sure were going to turn out. They all tasted good, but once again, I was going for replicating the original.
I used Smucker's seedless red raspberry jam. 
There are a few tricks that will help you be successful in making these cookies. They're a little persnickety and high-maintenance for a cookie. One of the reasons I like cookies so much is because they're usually unpretentious....but for the sake of this copycat recipe, we'll continue. 

The first trick to mention is that I bake these by doubling up cookie sheets so that the bottoms of the cookies don't get too dark. That's an important step to ensure that the bottoms don't get too brown before the rest of the cookie is baked through.

Also, secondly, be careful in measuring the oil. The measurement is 3/8 of a cup (or 6 Tbsp). I use a liquid measuring cup that has a mark between the 1/4 cup and the 1/2 cup mark. That is how much oil to use. **Update: However, I have also had just as much success with using 1/2 cup (8 Tbsp) of stick shortening (instead of oil), and this may be easier to measure. As a side note, when trying to mix the shortening with the sugars, it may take awhile for the shortening and the powdered sugar to come together with your hand mixer. That's ok, just keep going on low-medium speed until the shortening and sugars come together and are smooth.
3/8 of a cup is halfway between the 1/4 cup mark and 1/2 cup mark

Thirdly, the original cookie is mounded high and not flat. To help get this final shape, you bake the cookies for a short amount of time at a high temperature, and then you lower the temperature (so they don't burn) to finish off the bake. The initial high heat helps set their higher ball-shape, and then the lower temperature helps them finish baking slowly (which will also keep them soft).

Fourth, the white confectioner discs/chips can spread out quite a bit while baking which can make your cookies misshapen after they're done baking. To help prevent this, I actually cut most of the white chocolate discs in half (or just off-center; they don't have to be cut perfectly down the center). I set aside a few whole discs to put on the tops of the cookies (for aesthetic reasons). 
I set aside 9 whole discs to use for the tops of my 9 cookies, and cut the rest roughly in half

The fifth tip is that the dough is actually going to be a little bit crumbly as you make it. That is completely ok. It will come together. It looks a little crumbly because of the powdered sugar. And having it a little crumbly will create the shape and texture you want when you use a cookie scoop. I don't have any dry bits of flour here, though. It's all mixed together, but just a tad crumbly. If I push the crumbs together with my fingers, they should stick together. If your crumbs don't look exactly like this and your dough is a little smoother, don't panic. Forge ahead anyway and it will probably still work out (the cookies will just look a little more smooth rather than ragged).
before adding chips

after adding the chips

Sixth: You need a large cookie scoop for this (if you want to make them as big as the Disneyland ones). I have one that is a size 16. I actually think you could use a size larger, because this recipe makes them slightly smaller than the Disneyland version. Or, you could use a size 16 scoop to dish out 8 cookies (this recipe makes 9) and divide the leftover dough between the 8 cookies and you'd have cookies the same size as D-land. I'd say the measurement of this scoop is between 1/4 cup and 1/3 cup in size. If you don't care about size, just use a regular cookie scoop and probably use the smaller white chocolate chips (such as Ghiradelli or Nestle that come in a bag) as well. 


Seventh tip: to get the correct color in the jam, I actually add a drop or two or red food coloring gel to the raspberry jam. Obviously, this is an optional step and is not necessary for the taste of the cookie. But....I was going for copying the original. And the ingredients listed red food coloring. And when I didn't use it, the color wasn't quite the same. So there ya go. Put it in, or leave it out according to your preference.
I have added 2 drops of gel food coloring to my 2 Tbsp of jam and then stirred until it is smooth and incorporated

Tip numero 8: you're going to need to mix the raspberry jam in by hand to get a swirled/mottled effect. I achieve this by placing the jam in 5 or 6 places on top of the crumbly dough and then cutting it in with the back of a firm spatula. I kind of cut it into the dough (like with making pastry), and do a gentle mix. You just don't want to mix too much or you'll end up with pink cookies instead of swirls/chunks of jam throughout the cookie. I have also found it is easier to mix in the jam by hand with a batch of this size (just the 9 cookies). Meaning: if you wanted to make more cookies, make separate batches rather than doubling ingredients in one bowl. 
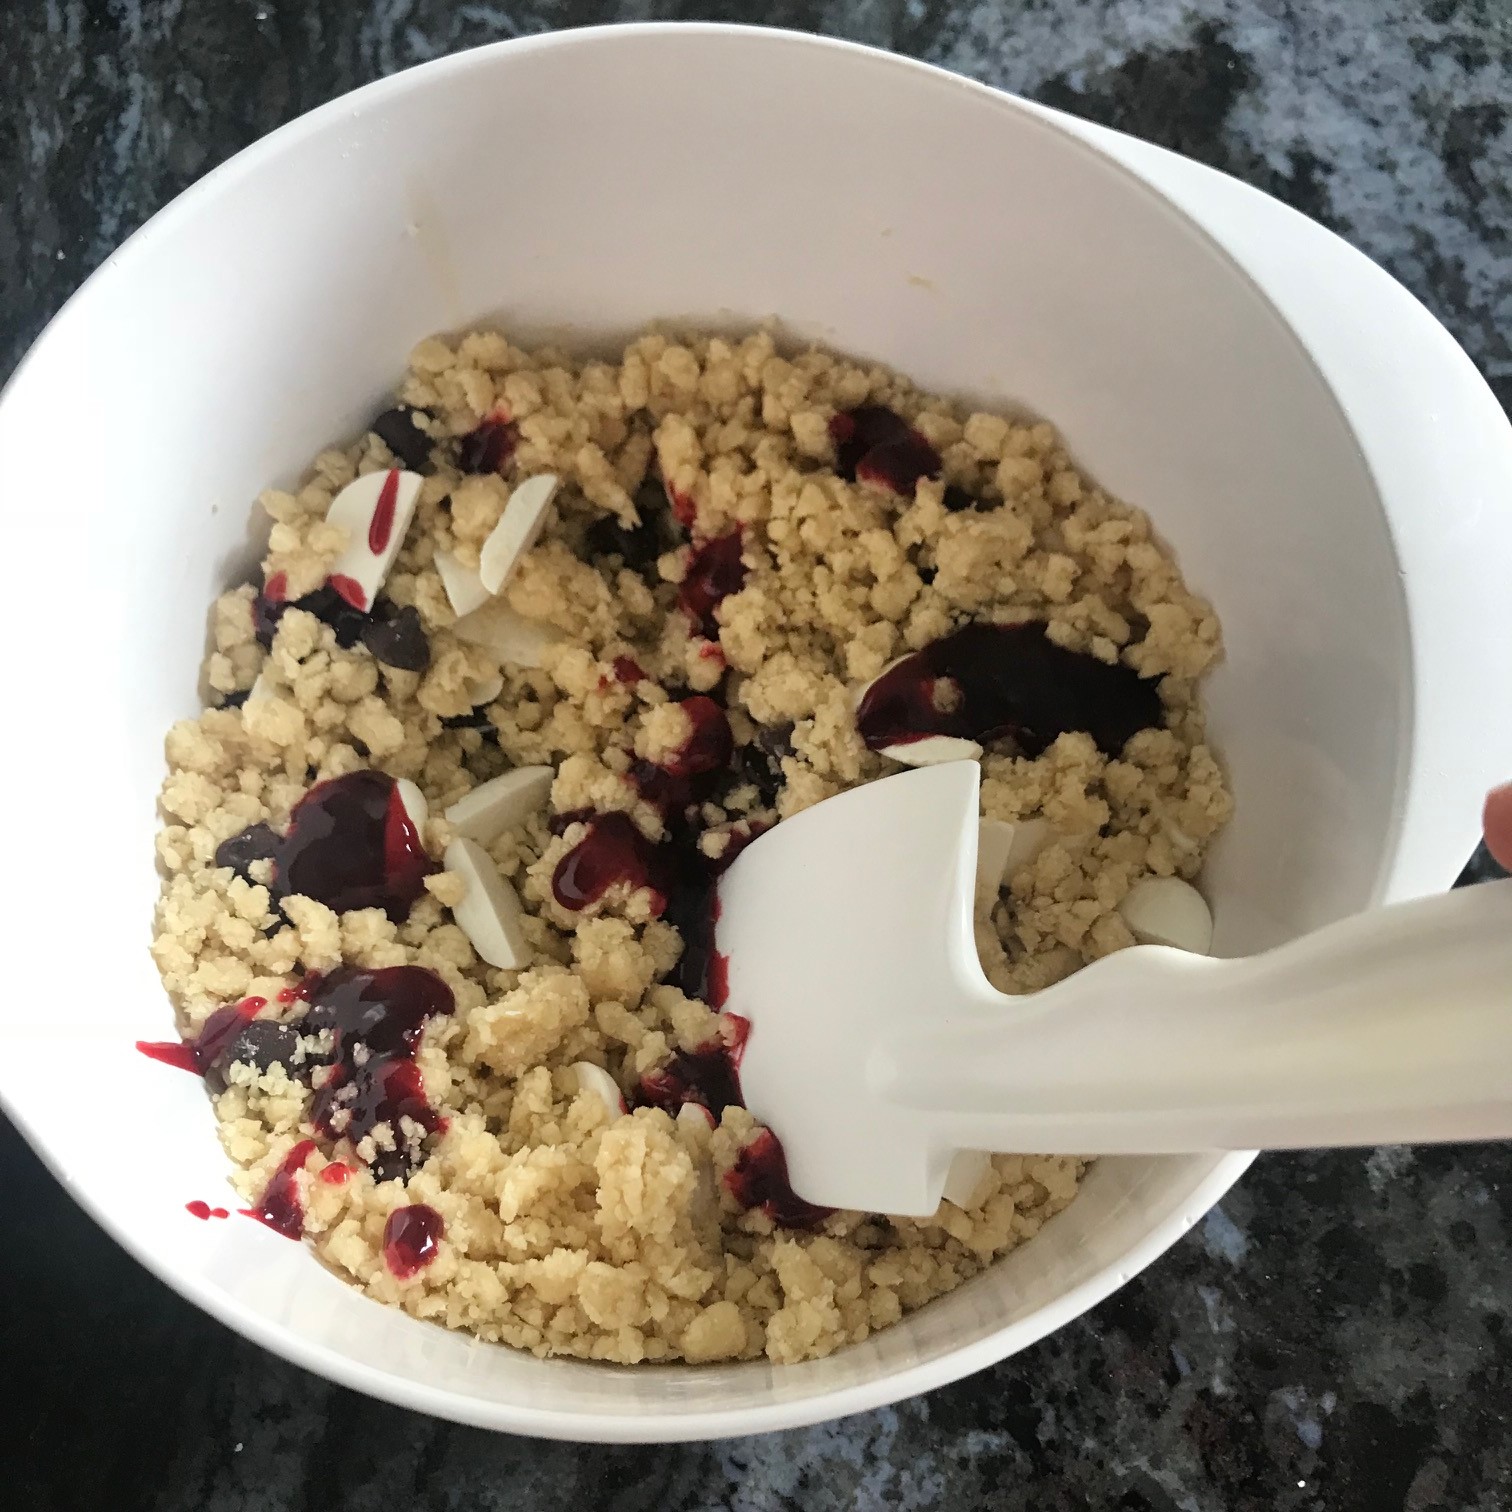
I have spooned 6 blobs of the colored jam in the dough, and then have begun to cut it in with my spatula

I'm done mixing it in and am satisfied with the swirl/mottling of the jam. The dough is still a little crumbly, although slightly less so
Lastly (I think), when I scoop these cookies, I place one of my set-aside white confectioners discs at the bottom (or top depending on how you look at it) of the scoop (either in the center or just off-center) before I scoop the dough in so that there is an entire disc on the top of the cookie. For the first cookie, I may adhere it to the scoop with a small amount of dough. Usually after scooping the first cookie there is a small amount of dough left inside so I attach the next disc to that for the following cookies. 

I have attached one confectioner's disc with a very small amount of dough before I scoop in the rest of the dough

I then put six cookies on the first doubled-up cookie sheet (I also use a silicone baking sheet), and three on the second doubled-up sheet. 
Look at those large cookie dough balls! The crumbs come together in the scoop and adhere to each other


So there you have it! Now you're ready to get going!


Disneyland White Chocolate Raspberry Cookies 

makes 9 large cookies; 

preheat oven to 400 degrees Fahrenheit and bake for 5 minutes, reduce temperature to 325 degrees Fahrenheit and bake for 8-10 additional minutes

INGREDIENTS:

1 1/2 cups + 1 Tbsp (8.5 oz) all purpose flour 
1/2 tsp. salt
1/2 tsp. baking soda

3/8 cup (1/4 cup + 2 Tbsp) of canola oil, OR 1/2 cup (8 Tbsp.) shortening
1 cup powdered sugar (4.2 oz) --if measuring by cup, level it off with knife
2 Tbsp.  (1 oz ) lightly packed light brown sugar 
1 egg
1/2 tsp. vanilla extract
1/4-1/2 tsp. raspberry extract (optional but recommended)

Scant 1/2 cup of white confectioners wafers/discs (cut in half) + 9 separate whole wafers
1/4 cup semi-sweet chocolate chips

1-1.5 Tbsp. seedless red raspberry jam
1-2 drops red food coloring 

INSTRUCTIONS:

1. Preheat the oven to 400 degrees; make sure the rack is in the center of the oven. Place the powdered sugar and light brown sugar in a medium mixing bowl. Add the canola oil (or shortening if using that instead) and mix with a hand-mixer, starting with low-speed and working up to high as it mixes together. Mix for about 30 seconds, or until combined and smooth. *If using shortening, it may take longer than 30 seconds for the sugars and shortening to become smooth, just keep mixing until smooth. 

2. Add the egg, vanilla extract, and raspberry extract (if using) to the mixture and mix for about a minute on high speed until well mixed. 

3. Mix the flour, baking soda, and salt together until well combined. Add the flour mixture into the oil/egg/sugar mixture. Mix on low speed with the hand-mixer until just combined. The mixture will be a tad crumbly. Add the scant half cup of white wafers (that you have cut in half) and the chocolate chips. Mix for a few seconds until the chips are incorporated. The mixture will still be crumbly.

4. In a small dish, combine the raspberry jam and 1-2 drops of red food coloring and stir until smooth and the dye is incorporated. Then spoon the dyed jam in 5-6 different spots over the dough. Use a firm spatula and cut in (almost like cutting in pastry dough) the jam into the dough by hand. Mix the jam is carefully and gently until the dough is swirled and mottled. If you mix too much, your dough will turn all pink. You want some pink parts and some mottled parts with jam. 

5. Place one reserved whole white confectioner wafer (adhere with a small amount of dough) in the bottom of a number 16 cookie scoop (place it slightly off center). Then scoop dough into the scoop and place on a silicone-lined double cookie sheet (2 cookie sheets stacked on top of each other). Place 5-6 cookie dough balls on one sheet, followed by 3-4 cookie dough balls on your second doubled-up cookie sheet.

6. Place the first sheet of cookies in the 400 degree oven for 5 minutes. Then reduce the temperature in the oven to 325 degrees and bake for an additional 8-10 minutes until the edges of cookie begin to get slightly golden and set.

7. Remove from oven and allow to cool on cookie sheet for 5 minutes before removing to a rack to completely cool. If your cookies are slightly misshapen (i.e. not round), immediately after removing from the oven, you can use a spatula to gently push any sides in to make the shape more round. 

8. Return oven to 400 degrees and repeat baking instructions for the second sheet of cookies. 

EAT!
Fresh out of oven!


I'm not gonna lie, I was pretty pleased with myself after this one. It only took me a year to post it. Actually...it took me a year to make them again because I ate so many versions last year that I needed to take a break. But now I have a bad feeling I'll be making a lot more of these in the coming days, if only to imagine that I am on vacation! Or to spare myself $4 a cookie in the future. Yikes! 

Thursday, June 30, 2016

Whole-Grain, High-Protein Breakfast Cookies

Have you noticed yet that I have a small....(**cough cough...BIG) obsession with cookies? Also, apparently I have a thing for making new cookie recipes.


Well this morning, little Miss 3-year old requested cookies for breakfast. Are you seeing a pattern here? Last time I made up a recipe was when she requested cupcakes for breakfast. You can find that muffin recipe here.


And, as I'm not really opposed to eating cookies for breakfast, making a high-protein and high-fiber cookie seemed like a fun challenge. That is where my education as a dietitian helps: I can find a way to justify cookies for breakfast. :) And I had all of these ingredients already on hand, so score!

Add a glass of milk and a couple of apricots (which is what the Bean had with her cookies), and you have a fairly well-rounded meal. Each cookie in this recipe has 4.5 grams of high-quality protein. That's pretty dang good for a cookie.

These cookies use whole grains. I used regular whole-wheat flour and instant oats (which are just whole oats that have been cut into smaller pieces for quicker cooking). They also have a healthy dose of omega-3 fatty acids because they have both walnuts and pecans in these babies. But, if you don't like nuts, you can keep them out.

And, well...because I love chocolate, they have some semi-sweet chocolate chips in there. To amp up the protein even more, in addition to the whole grains and nuts, I added non-fat dry milk powder (yes, I have that on hand), and some 100% whey protein (I found mine in the bulk section of my grocery store for a very reasonable price. Also, it is nice that it is 100% whey protein without added stuff like non-calorie sweeteners).

Of course, cookies for breakfast are always a hit, and these were no exception. And if you want to have cookies for breakfast too, well here you go! Now you too can justify having cookies for breakfast:

Whole-Grain High-Protein Breakfast Cookies

makes 2 dozen; bake at 325 degrees Fahrenheit for 12-15 minutes

INGREDIENTS:

1 1/4 cup whole wheat flour
1/2 cup instant oats
1/2 tsp. baking soda
1/4 tsp. salt
1 cup non-fat dry milk powder
2 Tbsp. whey protein powder

3/4 cup packed dark brown sugar
1/2 cup melted butter (1 stick)
1 Tbsp. vanilla extract
1 whole egg
1 egg yolk

3/4 cup semi-sweet chocolate chips
1/2 cup chopped pecans
1/2 cup chopped walnuts

INSTRUCTIONS:

1. Preheat the oven to 325 degrees; make sure the rack is in the center of the oven. Melt the butter in a microwave-safe container (like a glass pyrex measuring cup) in the microwave for about 20-30 seconds. In a medium-large mixing bowl, add the butter, sugar, egg, egg yolk, and vanilla. Mix with a hand-mixer on high speed for a minute. 

2. Mix the flour, baking soda, salt, oats, nonfat milk powder, and protein powder together until well combined. Add the flour mixture into the butter/egg/sugar mixture. Mix on low speed with the hand-mixer until just combined. Add in the nuts and chocolate chips and mix together. 

3. Place scoops of dough (I use a 1-oz. cookie scoop--about 2 Tbsp.) on a greased cookie sheet (or sheet with silicon baking liners). Flatten the dough balls a bit with the palm of your clean hand, or the back of a glass. Bake for 12-15 minutes, or until the edges just start to turn brown. Allow the cookies to cool on the sheet for a couple of minutes before transferring them to a wire rack to completely cool (if you can let them cool before you eat one). 

dough balls that have been flattened
4. Enjoy! Store in an air-tight container. They are best the day they are baked, but will still be good for a few more days. 


And in case you are wondering if cookies made with whole wheat flour can taste good, the answer is: most definitely! They have a lovely texture and an added nuttyflavor, But to tell you the truth, the 3-year old didn't notice anything different from plain-ol' regular cookies. And I couldn't really either. 

Tuesday, May 17, 2016

Simple, Delicious (and EASY) Dark Chocolate Cake with Chocolate Ganache Frosting

It's birthday season, and end-of-school-year season, and lot's-of-sewing-stuff season (wait, it's always that season), and I'm tired season. So when it came to choosing yet another cake to make for a birthday (and what did little Bean want? Chocolate of course!) I was extremely grateful for a simple recipe that was easy to throw together and not a ton of work (and most importantly, didn't leave a huge mess in my kitchen).


Let's just say that I'm not the cleanest baker....and homemade cakes usually come with homemade frosting which often comes with powdered sugar....ALL OVER. The mess is augmented by the fact that I'm usually in a hurry which means I'm kind of frantically flailing ingredients around. So the best part of this recipe is that it contains very few ingredients and NO powdered sugar.

The frosting is elegant because it's chocolate ganache, but ganache is SOOOOO much easier than a powdered sugar/butter frosting. Which led me to wonder: "why do I bother with any other frosting?" Hmmm...one of life's mysteries to ponder upon. 

Was I in a hurry with this cake? Of course. Did it take long to make? Not at all. Did it stress me out making this cake? Nope! Will I be doing this cake again? Possibly for every birthday from here on out whether it's asked for or not. Do I have a habit of asking myself a question and then answering it in the next sentence? Apparently! 

So, will I actually make this for every birthday now? Probably not. I'd get bored. But I will be making it again. That's for sure. In fact, I may have one baking right now.....


This cake takes about 5-10 minutes for the batter to come together, and then only 30 minutes to bake. And it uses regular all-purpose flour and still gives you a light and airy, moist texture. Mmmm. I also made it the day before and when it was cooled from baking, I wrapped the layers and froze them until a couple of hours before I needed them. I think this helps lock moisture in (keeping the cake moist) until the cake is needed. The buttermilk also helps with the fine, moist texture, as well as using boiling water. The original recipe from Hershey's calls for hot coffee, but I used boiling water (brought to a quick boil in my microwave in a glass Pyrex measuring cup) with a couple of teaspoons of vanilla instead. 

The end result is dark chocolate cake with a rich chocolaty flavor, fine crumb and moist texture. Then by adding a ganache frosting (just cream and semi-sweet chocolate....that's it) that is whipped until spreadable, you've got a delicious very easy, no-stress from-scratch chocolate cake. 

My dad said it was one of the best cakes he's every had. But.....he's my dad :). But this IS my new chocolate cake recipe I'll use now: for it's ease and lovely end result. And of course, because it tastes AWESOME. 


Black Magic EASY Chocolate Cake

2 cups sugar (for an extra-fine texture of your cake, use Baker's extra-fine sugar)
1/2 cup vegetable oil
2 teaspoons vanilla extract
1 cup buttermilk (or use 1 cup milk and add 1 Tbsp. white vinegar and allow it to "sour" for 5 minutes)
2 eggs
1 tsp. salt
2 tsp. baking soda
1 tsp. baking powder
1 cup boiling water
3/4 cup Cocoa (I used a Dutch-processed cocoa)
1 3/4 cup all-purpose flour

1. Preheat your oven to 350*. Cut parchment rounds for 2, 9-inch round cake pans (or you can bake it in a greased 9 x 13 pan). Grease and flour the cake pan(s).


2. In a large bowl, whisk together until well-combined the sugar, flour, salt, baking powder, and baking soda. Then add the eggs, oil, buttermilk, hot water, and vanilla and beat on medium speed for 2 minutes. The batter will be thin. 


3. Evenly distribute the batter between the pans and bake for 30 minutes, or until a cake tester/toothpick comes out just clean. Remove from oven and cool the cakes in the pan for 10 minutes. Then run a thin knife around edges of the pan and remove cakes to completely cool on a wire rack. Then either frost the cake, or wrap and freeze it until you are ready for it!


fresh out of the oven

cooling completely on the rack

Chocolate Ganache Whipped Frosting

2 cups heavy cream
24 oz. (1 pound plus 8 ounces) of semi-sweet chocolate, chopped (I confess that I used Costco semi-sweet chocolate chips here and it worked out awesome. 

1. Place chocolate (chopped) in a large bowl. Bring the heavy cream just to a boil on the stove. Pour the cream over the chocolate and stir until chocolate is mostly melted. Let sit for a few minutes, then stir until completely smooth. 

2. Cover and place frosting in the fridge until it is spreadable without being runny. If it gets too hard, place it in your microwave on reduced power (50%) for 10-second intervals, stirring in between to make sure you don't melt it too much. But if you do, just place back in the fridge for a bit for it to thicken it. When the frosting is spreadable, you can use it as-is and spread it on your cake, or whip it with some beaters for a few seconds. Keep in mind that the more you whip, the cooler the frosting gets and harder it may become (which may mean you will have to soften it again, but it won't ruin it). You can also use this frosting when it is slightly runny as a glaze to pour over the cake. You can't really mess it up, and it tastes great. And no powdered sugar! 


Enjoy! I know we sure did! (Especially the birthday girl...sniff sniff....who turned 3 and is growing up).

Tuesday, May 3, 2016

I'm-A-Jerk Carrot Cake: Delicious Cake with a Hint of Guilt

It's the Beginning of Birthday Season! Which means lots and lots of cakes!

First up? My mom! She loves spice cake and carrot cake, and I couldn't decide on one, so I did both!

Let's see how many more sentences I can end with an exclamation point?! I can keep going like this all night! What's that?! You feel like I'm shouting at you?! And not in a jubilant fun way, but in a kind of aggressively joyful way?! (I'll bet you never read those two adjectives in succession before. Language: it's amazing).

Alright, so I did a little overkill. I still haven't learned how to end on a high note. My apologies. :)

What were we talking about? Oh yeah, cake. Today I'll share how I made the carrot cake, although the spice cake was delicious too. Maybe I'll save that one for some other time.

Now when it comes to carrot cake, there are at least a couple different camps. One camp with fruit (pineapple and possibly raisins), and one without. Sometimes there's the addition of coconut, most of the time there are nuts.

Which camp does my mom lie in? She happens to like her carroty cake with pineapple, but she didn't say anything about raisins (thank goodness because plump, juicy raisins in baked goods are just gross), which means I left them out.

And...well, I left out the pineapple too (sorry Mom), because I can't stand most baked fruit in desserts. Pineapple gets mushy and stringy. And raisins...I already covered that. Plump and juicy are not the adjectives that I want with raisins. Actually, I don't really want raisins with any accompanying adjectives. Let's just say that you'll most likely never see a recipe for oatmeal raisin cookies on this blog. Kind of sad since I was born and raised in the Raisin Capital of the world.

I was a little selfish in making this cake. Because I wanted some carrot cake too, so I sided with the no-fruit camp. But it wasn't my birthday, so I guess I'm sort of a jerk. But I made her a cake, so that gives me some redemption, right? Ok, now I'm feeling guilty.


Where do I stand on the nut issue in this cake? It shouldn't surprise you that I'm pro-nut (when you can't beat 'em, join 'em, or when in Rome..., or some other cute saying that may apply here). So this cake has pecans (not walnuts) in it to enhance the flavor and texture. Hitting a crunchy nutty spot in a bite of cake: totally acceptable. Hitting a smooshy gooey raisin: completely unacceptable.

In my opinion, the best qualities of this I'm-A-Jerk Carrot Cake include the fact that it has three moist layers (so it is decadent) and it is covered by a traditional cream cheese frosting that is amped up a bit with a hint of ginger and orange flavor. And of course, the best quality (for which it is named): it has NO fruit in it...which makes me a bit of a jerk.

There is nothing to get in the way of enjoying this cake. No stringy pineapple bits to pull out of your teeth later, and no fat raisins you have to eat around, and possibly gag on when you miss one and you suddenly find yourself with a goo of sickeningly sweet, slightly fermented raisin in your mouth that has broken through it's skin. So yay for that!

Once again, overkill. I think I made my point on my disdain for raisins in baked goods.

I didn't spend hours poring over the pages of the Internet in deciding which recipe to use (I may sometimes do that....), mostly because I didn't have time. But I followed Paula Deen's recipe found here (because it didn't have fruit in it and had a lot of good ratings, many of which I read through), with some minor adjustments. And as a side note, there is NO WAY that this cake serves just 8 (which is what Ms. Deen's recipe states). It has three layers, people. It definitely serves at least twice that many.


And for the cream cheese frosting, I decided to amp it up a bit with a hint of orange and some fresh ginger. I got the idea from this recipe from the Food Network here.

Making this cake is not difficult; it uses simple ingredients, most of which you probably have on hand, and uses all-purpose flour (not cake flour), so it's even more user-friendly. I also used my hand-mixer instead of a stand mixer, which also made it less complicated.

You make a simple cake base with some cinnamon, nutmeg, and ginger, and fold in some chopped pecans and 3 cups of carrots. Then divide the batter evenly between 3, 9-inch round cake pans, bake for about 25 minutes (also an alteration from her recipe---the original recipe calls for 40 minutes, but the cake would be way overbaked by then).


The trickiest part of making this cake is making sure you use parchment paper in the bottom of each cake pan. And even then you need to spray the parchment and sides of the pan generously with cooking spray. If you don't, your cakes will stick rather badly to the bottom and sides. I ran a thin knife around the sides of the cake pan after the cakes had cooled on the rack for about 10 minutes. And I had to coax the bottom (apparently I left about 1/8th of an inch ring uncovered by parchment) out a bit carefully.


To make parchment rounds, trace the bottom of your cake pans onto parchment paper and cut them out. Then spray the bottom of the cake pan first, place the parchment inside (now the parchment will stick to the pan), and spray the parchment and sides of cake pan again. Or....order parchment rounds off of Amazon. I totally intend to do that some day, but for some reason I haven't brought myself to do it yet.

The layers of this cake don't rise very tall (they're about an inch thick each). When the layers are cool, I recommend wrapping them in plastic-wrap and placing in freezer (if not eating/serving the cake that day). I made this cake the night before it was served, and I actually froze the frosting in layers too (I piped frosting on wax paper inside two of the cake pans to make two layers of frosting). The frosting took about 30 minutes to freeze enough for me to layer my cake with frosting (minus the top layer of frosting) right in one pan, and inverting the other pan over the top to encase the cake. I then used plastic wrap to seal the two cake pans and kept the cake in the freezer until about an hour before it was served. Then I frosted the top, decorated it with some whole pecans, and it was ready to go!
So without further ado, here is the recipe I used:

I'm-a-Jerk Carrot Cake

2 cups all-purpose flour
2 cups sugar
2 tsp. baking soda
1 Tbsp. ground cinnamon
1/2 tsp. ground ginger
1/2 tsp. nutmeg
1 tsp. salt
4 eggs
1 1/2 cups vegetable oil
3 cups grated carrots
1 1/2 cup chopped pecans

1. Preheat the oven to 350 degrees Fahrenheit. Cut 3 parchment rounds and place in the bottom of 3, 9 inch round cake pans. Grease the pans.

2. Combine the flour, sugar, spices, baking soda, and salt together in a large bowl; whisk to evenly distribute ingredients. 

3. Add the eggs in one at a time while using a hand mixer on medium. Add the oil in a slow stream until all combined. Fold in the carrots and pecans using a spatula or large spoon. 

4. Distribute the batter evenly between the 3 pans, and bake for 25 to 35 minutes. Begin checking for doneness around 20 minutes. The cakes are done when a cake tester (toothpick) comes out clean, or with a couple of moist crumbs. 

5. Allow cakes to cool in pan for about 10 minutes, then carefully run a thin knife around the edges of the pan to release any portions of the cake that may be stuck to the sides of the pans. Carefully remove the cakes from pan (careful, the layers are not very thick) and cool completely on a wire rack. You can either frost them when they are completely cool, or wrap the layers in plastic wrap and freeze until you are ready to use them. 

6. Place bottom layer of cake on serving dish, top with the cream cheese frosting, followed by another layer of cake and a subsequent layer of frosting. Add the last layer of the cake and top it with frosting. I left the sides free of frosting, but feel free to frost the sides if you want to. I decorated the top of the cake with half pecan pieces. Refrigerate the cake before serving, at least one hour (if it was not previously frozen). Store the leftover cake in the refrigerator. 


Orange-Ginger Cream Cheese Frosting

1 stick butter (1/2 cup) at room temperature
2, 8 oz. bricks of cream cheese (do not use Neufchatel cheese, it will make your frosting too runny)
1 2-4 inch piece of ginger root
1 Tbsp. fresh orange juice
1/2 tsp. vanilla extract
1/2 tsp. grated orange zest
6 cups + powdered sugar. 

1. Grate the ginger onto a piece of cheesecloth, a sturdy paper towel, or a coffee filter. Squeeze the juice into a small bowl. You should have around 1 Tbsp. of ginger root juice. Add the vanilla, orange zest, and orange juice to the bowl.
piece of ginger root

grated ginger root into a coffee filter

ginger root juice: smelled great!


I just squeezed a bit of juice from the orange I used for the zest


2. In a separate medium-large bowl, mix the butter and cream cheese bricks together on high speed until fully combined and creamy. Beat in the juice mixture on medium speed. 


3. On low speed, add powdered sugar 1 cup at a time until you achieve the desired consistency. Any un-used frosting can remain in an airtight container in the refrigerator for up to two weeks. 


This cake and delicious frosting was a crowd pleaser! And it didn't take too long to make; it was delicious and not too complicated. 


Luckily I wasn't too big of a jerk: my mom liked it. So I only felt a small twinge of guilt as I enjoyed my piece. 

Happy Birthday Mom!

Next up on the birthday parade? My husband. But he doesn't like cake, so I guess I'll avoid being selfish this time and actually make something he really wants ;). And if I'm lucky, I'll like it too (but let's face it, if it has sugar in it, I'm probably gonna like it. As long as it doesn't include raisins!).