Showing posts with label cookies. Show all posts

Wednesday, July 25, 2018

Disneyland White Chocolate Raspberry Cookies

First off, I know it has literally been years since I have posted anything. HOWEVER, and this is a big however, I NEEDED to post this recipe. Mostly because of all the blood, sweat, and tears that went into creating it (note: do not take me literally here. There is no blood in these cookies. And any tears that may have fallen in are only tears of joy as I realized how close these cookies are to the real deal, and as far as sweat....well, I'll let you decide). If you don't care about how I ended at this recipe, just scroll to the bottom for the actual recipe, but don't forget to read the tips, as they're important to making the cookies successfully.


My husband is a little obsessed with Disneyland. If you know him, you know how much random trivia he knows about the place. And because of this, some of this knowledge has trickled down to me. What's so great about July 17, 1955? Anyone? Anyone? You're going to have to google it.

Anyway, for the past few years, Disneyland is where our family has spent our family vacations together. Yes it is hot during Summer, and yes it is crowded, and yes it is overpriced. But it IS a magical place and with the ages of our children, and my husband's undying love and allegiance, it works well for all of us. It is also a magical place to get treats (which is just as exciting for me as going on the rides....oh, and of course seeing my kids happy. That too. Don't forget that).

One of the treats I had heard about (and then, of course, read about on the Internet) was the large white chocolate raspberry cookies that you can find at the park. Apparently, people love these things. So last year, I bought my first one. To be honest, I think the one I bought was stale. My husband (lover of all things Disneyland and white chocolate too) loved it. I saved part of my cookie (weird, I know) to come home and try to re-create the recipe. Because if you know me, you know I have my own obsession with cookies, and I like trying to figure out recipes. It's almost like I can't rest until I figure it out.


So during the hottest weeks of the year in 2017, immediately after our family trip, I took to turning my oven on for hours at a time and re-creating the recipe (which included analyzing the color, texture, and consistency of the small bite I had brought home with me--I made a mental note to bring home an entire cookie at some other point). And then today, the day after our most recent trip, I decided it was time to make them again and post them. Especially since I brought home an entire cookie this time.
Actual Disneyland Cookie I bought yesterday

inside of actual Disneyland cookie

Of course, there are already lots of copycat recipes of this cookie on the Internet and Pinterest, but in looking the recipes over and examining the pictures, none of them seemed to actually look like the cookies found in the park. I'm sure they are still good and delicious cookies; I was just looking to recreate as close to a replica as I could to the cookie. In my searching, I came across the knowledge that the cookies in Disneyland are actually made by a company called Selma's. So I perused their website, looked over the ingredients that they had listed in their cookies, and went to work.
Side-by-side comparison of my cookie vs. the one from D-land. Mine is on the right. It is slightly smaller (but you could adjust the recipe to make 8 instead of 9 cookies and it would be same size--or use a larger scoop)
I noticed that their cookies had powdered sugar in them instead of granulated sugar, which was interesting to me. I don't know if it makes a difference, but I used C&H brand powdered sugar in the recipe. Also, as a commercial bakery, Selma's recipe uses hydrogenated palm oil, which I wasn't going to be able to use. I experimented with coconut oil (melted), butter, melted butter, and canola oil. And the one that worked the best for the texture was the canola oil. So a cookie with powdered sugar and canola oil. Who knew? This was different than any other cookie I'd made before. (*update: you can make these with shortening as well--which is hydrogenated oil like a bakery would use. That option is listed in recipe below as well).
These are the notes on the different variations I tried (there is also writing on the backs of the papers)
So, I won't go too much more into detail about my experimenting, other than to say I got pretty good at splitting an egg in half (yolk included) so that I didn't have to make (and waste ingredients if I didn't have to) full batches of cookies that I wasn't sure were going to turn out. They all tasted good, but once again, I was going for replicating the original.
I used Smucker's seedless red raspberry jam. 
There are a few tricks that will help you be successful in making these cookies. They're a little persnickety and high-maintenance for a cookie. One of the reasons I like cookies so much is because they're usually unpretentious....but for the sake of this copycat recipe, we'll continue. 

The first trick to mention is that I bake these by doubling up cookie sheets so that the bottoms of the cookies don't get too dark. That's an important step to ensure that the bottoms don't get too brown before the rest of the cookie is baked through.

Also, secondly, be careful in measuring the oil. The measurement is 3/8 of a cup (or 6 Tbsp). I use a liquid measuring cup that has a mark between the 1/4 cup and the 1/2 cup mark. That is how much oil to use. **Update: However, I have also had just as much success with using 1/2 cup (8 Tbsp) of stick shortening (instead of oil), and this may be easier to measure. As a side note, when trying to mix the shortening with the sugars, it may take awhile for the shortening and the powdered sugar to come together with your hand mixer. That's ok, just keep going on low-medium speed until the shortening and sugars come together and are smooth.
3/8 of a cup is halfway between the 1/4 cup mark and 1/2 cup mark

Thirdly, the original cookie is mounded high and not flat. To help get this final shape, you bake the cookies for a short amount of time at a high temperature, and then you lower the temperature (so they don't burn) to finish off the bake. The initial high heat helps set their higher ball-shape, and then the lower temperature helps them finish baking slowly (which will also keep them soft).

Fourth, the white confectioner discs/chips can spread out quite a bit while baking which can make your cookies misshapen after they're done baking. To help prevent this, I actually cut most of the white chocolate discs in half (or just off-center; they don't have to be cut perfectly down the center). I set aside a few whole discs to put on the tops of the cookies (for aesthetic reasons). 
I set aside 9 whole discs to use for the tops of my 9 cookies, and cut the rest roughly in half

The fifth tip is that the dough is actually going to be a little bit crumbly as you make it. That is completely ok. It will come together. It looks a little crumbly because of the powdered sugar. And having it a little crumbly will create the shape and texture you want when you use a cookie scoop. I don't have any dry bits of flour here, though. It's all mixed together, but just a tad crumbly. If I push the crumbs together with my fingers, they should stick together. If your crumbs don't look exactly like this and your dough is a little smoother, don't panic. Forge ahead anyway and it will probably still work out (the cookies will just look a little more smooth rather than ragged).
before adding chips

after adding the chips

Sixth: You need a large cookie scoop for this (if you want to make them as big as the Disneyland ones). I have one that is a size 16. I actually think you could use a size larger, because this recipe makes them slightly smaller than the Disneyland version. Or, you could use a size 16 scoop to dish out 8 cookies (this recipe makes 9) and divide the leftover dough between the 8 cookies and you'd have cookies the same size as D-land. I'd say the measurement of this scoop is between 1/4 cup and 1/3 cup in size. If you don't care about size, just use a regular cookie scoop and probably use the smaller white chocolate chips (such as Ghiradelli or Nestle that come in a bag) as well. 


Seventh tip: to get the correct color in the jam, I actually add a drop or two or red food coloring gel to the raspberry jam. Obviously, this is an optional step and is not necessary for the taste of the cookie. But....I was going for copying the original. And the ingredients listed red food coloring. And when I didn't use it, the color wasn't quite the same. So there ya go. Put it in, or leave it out according to your preference.
I have added 2 drops of gel food coloring to my 2 Tbsp of jam and then stirred until it is smooth and incorporated

Tip numero 8: you're going to need to mix the raspberry jam in by hand to get a swirled/mottled effect. I achieve this by placing the jam in 5 or 6 places on top of the crumbly dough and then cutting it in with the back of a firm spatula. I kind of cut it into the dough (like with making pastry), and do a gentle mix. You just don't want to mix too much or you'll end up with pink cookies instead of swirls/chunks of jam throughout the cookie. I have also found it is easier to mix in the jam by hand with a batch of this size (just the 9 cookies). Meaning: if you wanted to make more cookies, make separate batches rather than doubling ingredients in one bowl. 
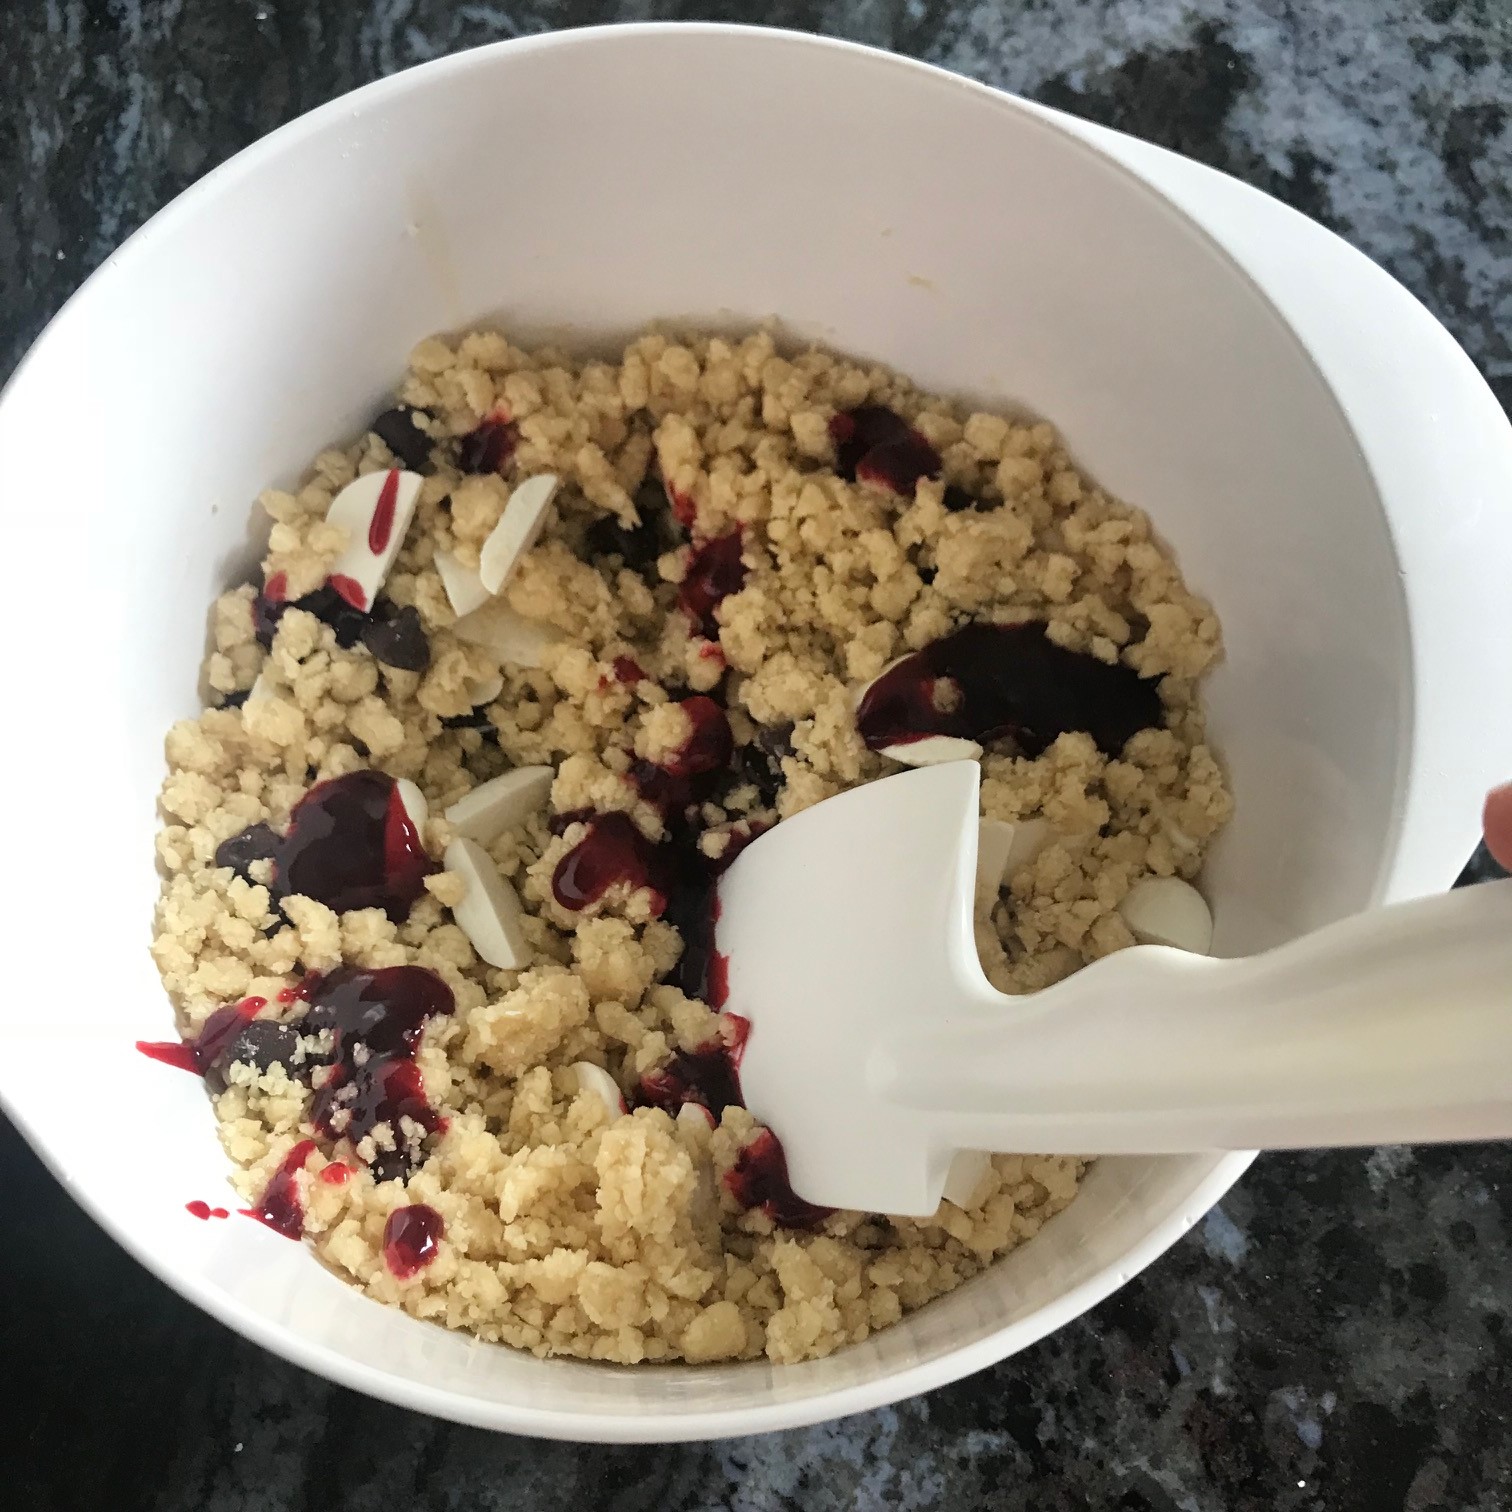
I have spooned 6 blobs of the colored jam in the dough, and then have begun to cut it in with my spatula

I'm done mixing it in and am satisfied with the swirl/mottling of the jam. The dough is still a little crumbly, although slightly less so
Lastly (I think), when I scoop these cookies, I place one of my set-aside white confectioners discs at the bottom (or top depending on how you look at it) of the scoop (either in the center or just off-center) before I scoop the dough in so that there is an entire disc on the top of the cookie. For the first cookie, I may adhere it to the scoop with a small amount of dough. Usually after scooping the first cookie there is a small amount of dough left inside so I attach the next disc to that for the following cookies. 

I have attached one confectioner's disc with a very small amount of dough before I scoop in the rest of the dough

I then put six cookies on the first doubled-up cookie sheet (I also use a silicone baking sheet), and three on the second doubled-up sheet. 
Look at those large cookie dough balls! The crumbs come together in the scoop and adhere to each other


So there you have it! Now you're ready to get going!


Disneyland White Chocolate Raspberry Cookies 

makes 9 large cookies; 

preheat oven to 400 degrees Fahrenheit and bake for 5 minutes, reduce temperature to 325 degrees Fahrenheit and bake for 8-10 additional minutes

INGREDIENTS:

1 1/2 cups + 1 Tbsp (8.5 oz) all purpose flour 
1/2 tsp. salt
1/2 tsp. baking soda

3/8 cup (1/4 cup + 2 Tbsp) of canola oil, OR 1/2 cup (8 Tbsp.) shortening
1 cup powdered sugar (4.2 oz) --if measuring by cup, level it off with knife
2 Tbsp.  (1 oz ) lightly packed light brown sugar 
1 egg
1/2 tsp. vanilla extract
1/4-1/2 tsp. raspberry extract (optional but recommended)

Scant 1/2 cup of white confectioners wafers/discs (cut in half) + 9 separate whole wafers
1/4 cup semi-sweet chocolate chips

1-1.5 Tbsp. seedless red raspberry jam
1-2 drops red food coloring 

INSTRUCTIONS:

1. Preheat the oven to 400 degrees; make sure the rack is in the center of the oven. Place the powdered sugar and light brown sugar in a medium mixing bowl. Add the canola oil (or shortening if using that instead) and mix with a hand-mixer, starting with low-speed and working up to high as it mixes together. Mix for about 30 seconds, or until combined and smooth. *If using shortening, it may take longer than 30 seconds for the sugars and shortening to become smooth, just keep mixing until smooth. 

2. Add the egg, vanilla extract, and raspberry extract (if using) to the mixture and mix for about a minute on high speed until well mixed. 

3. Mix the flour, baking soda, and salt together until well combined. Add the flour mixture into the oil/egg/sugar mixture. Mix on low speed with the hand-mixer until just combined. The mixture will be a tad crumbly. Add the scant half cup of white wafers (that you have cut in half) and the chocolate chips. Mix for a few seconds until the chips are incorporated. The mixture will still be crumbly.

4. In a small dish, combine the raspberry jam and 1-2 drops of red food coloring and stir until smooth and the dye is incorporated. Then spoon the dyed jam in 5-6 different spots over the dough. Use a firm spatula and cut in (almost like cutting in pastry dough) the jam into the dough by hand. Mix the jam is carefully and gently until the dough is swirled and mottled. If you mix too much, your dough will turn all pink. You want some pink parts and some mottled parts with jam. 

5. Place one reserved whole white confectioner wafer (adhere with a small amount of dough) in the bottom of a number 16 cookie scoop (place it slightly off center). Then scoop dough into the scoop and place on a silicone-lined double cookie sheet (2 cookie sheets stacked on top of each other). Place 5-6 cookie dough balls on one sheet, followed by 3-4 cookie dough balls on your second doubled-up cookie sheet.

6. Place the first sheet of cookies in the 400 degree oven for 5 minutes. Then reduce the temperature in the oven to 325 degrees and bake for an additional 8-10 minutes until the edges of cookie begin to get slightly golden and set.

7. Remove from oven and allow to cool on cookie sheet for 5 minutes before removing to a rack to completely cool. If your cookies are slightly misshapen (i.e. not round), immediately after removing from the oven, you can use a spatula to gently push any sides in to make the shape more round. 

8. Return oven to 400 degrees and repeat baking instructions for the second sheet of cookies. 

EAT!
Fresh out of oven!


I'm not gonna lie, I was pretty pleased with myself after this one. It only took me a year to post it. Actually...it took me a year to make them again because I ate so many versions last year that I needed to take a break. But now I have a bad feeling I'll be making a lot more of these in the coming days, if only to imagine that I am on vacation! Or to spare myself $4 a cookie in the future. Yikes! 

Thursday, June 30, 2016

Whole-Grain, High-Protein Breakfast Cookies

Have you noticed yet that I have a small....(**cough cough...BIG) obsession with cookies? Also, apparently I have a thing for making new cookie recipes.


Well this morning, little Miss 3-year old requested cookies for breakfast. Are you seeing a pattern here? Last time I made up a recipe was when she requested cupcakes for breakfast. You can find that muffin recipe here.


And, as I'm not really opposed to eating cookies for breakfast, making a high-protein and high-fiber cookie seemed like a fun challenge. That is where my education as a dietitian helps: I can find a way to justify cookies for breakfast. :) And I had all of these ingredients already on hand, so score!

Add a glass of milk and a couple of apricots (which is what the Bean had with her cookies), and you have a fairly well-rounded meal. Each cookie in this recipe has 4.5 grams of high-quality protein. That's pretty dang good for a cookie.

These cookies use whole grains. I used regular whole-wheat flour and instant oats (which are just whole oats that have been cut into smaller pieces for quicker cooking). They also have a healthy dose of omega-3 fatty acids because they have both walnuts and pecans in these babies. But, if you don't like nuts, you can keep them out.

And, well...because I love chocolate, they have some semi-sweet chocolate chips in there. To amp up the protein even more, in addition to the whole grains and nuts, I added non-fat dry milk powder (yes, I have that on hand), and some 100% whey protein (I found mine in the bulk section of my grocery store for a very reasonable price. Also, it is nice that it is 100% whey protein without added stuff like non-calorie sweeteners).

Of course, cookies for breakfast are always a hit, and these were no exception. And if you want to have cookies for breakfast too, well here you go! Now you too can justify having cookies for breakfast:

Whole-Grain High-Protein Breakfast Cookies

makes 2 dozen; bake at 325 degrees Fahrenheit for 12-15 minutes

INGREDIENTS:

1 1/4 cup whole wheat flour
1/2 cup instant oats
1/2 tsp. baking soda
1/4 tsp. salt
1 cup non-fat dry milk powder
2 Tbsp. whey protein powder

3/4 cup packed dark brown sugar
1/2 cup melted butter (1 stick)
1 Tbsp. vanilla extract
1 whole egg
1 egg yolk

3/4 cup semi-sweet chocolate chips
1/2 cup chopped pecans
1/2 cup chopped walnuts

INSTRUCTIONS:

1. Preheat the oven to 325 degrees; make sure the rack is in the center of the oven. Melt the butter in a microwave-safe container (like a glass pyrex measuring cup) in the microwave for about 20-30 seconds. In a medium-large mixing bowl, add the butter, sugar, egg, egg yolk, and vanilla. Mix with a hand-mixer on high speed for a minute. 

2. Mix the flour, baking soda, salt, oats, nonfat milk powder, and protein powder together until well combined. Add the flour mixture into the butter/egg/sugar mixture. Mix on low speed with the hand-mixer until just combined. Add in the nuts and chocolate chips and mix together. 

3. Place scoops of dough (I use a 1-oz. cookie scoop--about 2 Tbsp.) on a greased cookie sheet (or sheet with silicon baking liners). Flatten the dough balls a bit with the palm of your clean hand, or the back of a glass. Bake for 12-15 minutes, or until the edges just start to turn brown. Allow the cookies to cool on the sheet for a couple of minutes before transferring them to a wire rack to completely cool (if you can let them cool before you eat one). 

dough balls that have been flattened
4. Enjoy! Store in an air-tight container. They are best the day they are baked, but will still be good for a few more days. 


And in case you are wondering if cookies made with whole wheat flour can taste good, the answer is: most definitely! They have a lovely texture and an added nuttyflavor, But to tell you the truth, the 3-year old didn't notice anything different from plain-ol' regular cookies. And I couldn't really either. 

Tuesday, December 8, 2015

My Life: The Great Chocolate Chip Cookie Experiment

Don't worry, I'm not going to post the endless details of all the versions of chocolate chip cookies I've experimented with. And here is why:

MY LIFE has been The Great Chocolate Chip Cookie Experiment. Years and years of baking chocolate chip cookies. I have tweaked and re-tweaked recipes forEVER. I have eaten SOO SOOOOO many cookies. If I actually wrote the details of all the cookies I've tried, this would be a long book, not a blog post. And it would get cumbersome and boring.

I wish I could say I bake them all for my kids and family. But I don't. I bake them for me. Good thing I have kids to justify all the baking, "um, yeah, I am baking these for the kids. Sure..."

I have made all those versions out there on the Internet claiming to be the best, too. Including the New York Times version, the Serious Eats version, and many many many many others. If one of my sisters recommends I try a recipe, I also MUST try it. I cannot let it lie. I have a compulsion.

My original favorite recipe (years ago) was the kind that had vanilla pudding in the mix. Because they stayed soft. They're still good, but I've moved on.

I've tried browned butter (which sounds awesome, and I LOVE browned butter taste and smell) in cookies, but it didn't actually change the end-taste of the cookies compared to those with un-browned butter. So it is a lot of work for no added benefit.

I've cut up high-quality chocolate (instead of using chocolate chips), but in the end, chocolate doesn't chop so well and makes a mess when chopping, and using a good quality semi-sweet chocolate chip works just as well. Because part of the joy of chocolate chip cookies is the convenience in making them.

I've tried resting/chilling the dough, as well as baking right after the dough comes together. There is slight difference in flavor and a difference in appearance either way. But the awesome thing about the recipe I'm going to share is that it works well both ways: baked right away as well as baking after chilled. Baked right away, they have more of that rough appearance to them. I do like the texture slightly better once the dough has rested (and so do my kids), and the color is a nice toffee color, but the appearance is a little more smooth. But you're not going to disappoint anyone by giving them cookies that haven't been made with chilled and rested dough.

So here is how I like my chocolate chip cookies:

I like them to be crispy on the outside, and fudgy in the middle (believe it or not, melted butter helps them be fudgy). I'm not a fan of cakey chocolate chip cookies. They also MUST be made with butter. No margarine (gross). And NO shortening: not in chocolate chip cookies. No way. The butter and sugar caramelize together when baking to make this wonderful toffee-like buttery flavor. Yum. And I like a lot of vanilla, with a good balance of salt, and with baking soda to give it a slight rough/craggly look. And chocolate: good, semi-sweet chocolate. Luckily, Costco has a really good semi-sweet chocolate chip made with pure vanilla. They're awesome. And I haven't been able to go back to other chocolate chips (sorry Nestle) since. Also required of the perfect chocolate chip cookie: it must stay moist. I hate a dry cookie; it's so disappointing when you bake cookies and they end up dry the next day. That's where a higher ratio of egg yolk comes in to play in this recipe. And they cannot be flat. And they cannot be mountainous and cakey (I believe I already said that...). So that's a rough description of my perfect chocolate chip cookie.

And here is what they look like:


And yeah, they taste wonderful. And yeah, they stay soft and fudgy even the next day (if they last that long). And yeah, you're gonna love 'em.


You can get extra fancy if you want and sprinkle them with sea-salt once they come out of the oven.

I weighed the ingredients for these cookies. but I have also posted volumetric measurements so it is a more user-friendly recipe.

I adapted this recipe here.

Here is the recipe for these bad puppies:

My Favorite Chocolate Chip Cookies

12 oz. all-purpose flour (2 1/4 cups)
3/4 tsp. baking soda
3/4 tsp. fine sea salt (or table salt)
3/4 cup (1 1/2 sticks) butter, melted and slightly cooled--just not hot
7 oz. (1 cup packed) dark brown sugar
4 oz. (1/2 cup) white sugar
1 Tbsp. vanilla extract
1 egg + 1 yolk
8 oz. semi-sweet chocolate chips (2 cups)


1. Preheat oven to 325 degrees (**if baking immediately). Line baking sheets with silicone liners, or use parchment paper.

2. In the bowl of a mixer, and using paddle attachment, beat sugars (brown and white) and melted butter on medium speed until well incorporated (about 1 minute). Add the egg and one egg yolk and the vanilla extract and beat on medium-high speed until the mixture is light in color, about 3-5 minutes.

3. Meanwhile, sift or whisk together the flour, salt, and baking soda together in a bowl. Pour the flour mixture into the mixer with the sugar/eggs and with mixer on low speed, mix together until just combined (about 15 seconds). While there is still some white flour showing/not fully incorporated, add the chocolate chips and mix on low until just combined (about 15 seconds).

4. Place the dough in an airtight container and place in fridge for 8 hours, or overnight. You can keep it in fridge for up to 3 days. 

**Alternatively, scoop dough into rounds (I use a #40 disher) and place on cookie sheets, at least a couple of inches apart. Bake in 325 degree oven for 11-14 minutes, possibly longer depending on oven. The edges will be turning golden, and the middle will still look slightly moist/underdone. Take the cookies out and allow to cool on sheets for 4-5 minutes before transferring to a wire rack to fully cool. Store cooled cookies in an airtight container. 

5. When ready to bake chilled dough, allow oven to preheat to 325 degrees (give your oven a good 20 minutes to warm up). Place cookie dough balls (about the size of a walnut) on cookie sheet and flatten very slightly with the palm of your hand. Place in oven and bake for13-16 minutes, or until the edges are browned and the middle still looks very slightly underdone.  Take the cookies out and allow to cool on sheets for 4-5 minutes before transferring to a wire rack to fully cool. Store cooled cookies in an airtight container. 


ENJOY!!

They will have a slight crunch as you bite into them, and then a fudgy, gooey chocolaty center to die for. And they will taste of toasted buttery, chocolaty goodness. Mmmm.


These are seriously my favorite chocolate chip cookies I have made and/or tasted. And I've eaten and made a lot. I hope when we die there's not a counter in heaven showing how many cookies we ate in life. 'Cause if there is, I think all of heaven will line up to see the "girl who out-ate all other cookie eaters." Well, my sister and I might tie. 

Friday, April 10, 2015

well hello there! wanna cookie?

...Except your parents probably told you not to take cookies from strangers. So how about a recipe for some cookies instead?

I did it: I'm blogging. At least I think that is what I'm currently doing... I am reminded of how Ryan created a basic Word document for Creed (on "The Office") to shield the world from Creed's thoughts, and what I'm typing now looks pretty much like a Word document... Anyway: Here I am, World! There is no Ryan to protect you. He was kind of a slime-ball anyway. You can do better.

So what do I have to say? Well, I hope to post mainly on food (baking is an addiction for me...seriously) and crafts (a fun new venture for me), with maybe a sprinkle of nutrition every once in a while. I'm a Registered Dietitian Nutritionist (RDN) by education and profession, you see. But that might mostly be to self-validate that there is some nutrition in all the goodies I like to make and eat. That's why I went to school: to tell the world it's okay to eat cookies. Not really, but that's what kinda came out of it.

In the spirit of the name of this blog, I decided to share a recipe of my mom's that I was too afraid of to try as a young child, but when I finally did, WOW! I realized that I had been missing out.

Orange-Carrot Cookies.


Yum. See? There's some nutrition in there. Carrots, people! and oranges (at least the zest). And don't forget walnuts. You've got your beta-carotene, some vitamin C, and omega-3's. Alright, I see that this will get annoying quickly. I promise I won't do that too often.

As a side note, you will notice that this cookie recipe uses shortening instead of butter. I am a self-proclaimed butter snob. And proud of it. 99.9% of my cookie recipes use butter. Butter just makes things taste sooooo much better. I also promise not to get too into food chemistry here, but I like the baking effects of butter as well. With that being said, this particular recipe actually works better with shortening. You can still use butter if you want, but the cookies will be a little more flat, and they won't look quite right. You can always mix part butter, part shortening too if you like. Hey, it's your cookie recipe now.

If you want to use rinsed canned diced carrots in this recipe (instead of cooking and mashing fresh carrots), they'll work just as well and save you some trouble. They're easy to mash because they're already cooked. Or you can cook them yourself; it's not too hard. It's up to you!

On how to cook carrots in the microwave, look here. You may want to add another minute or two in the microwave because you want these carrots to be easily mash-able.  The cool thing about cooking them in the microwave is that they also retain more nutrients in them than if you had cooked them on the stove. But I digress...

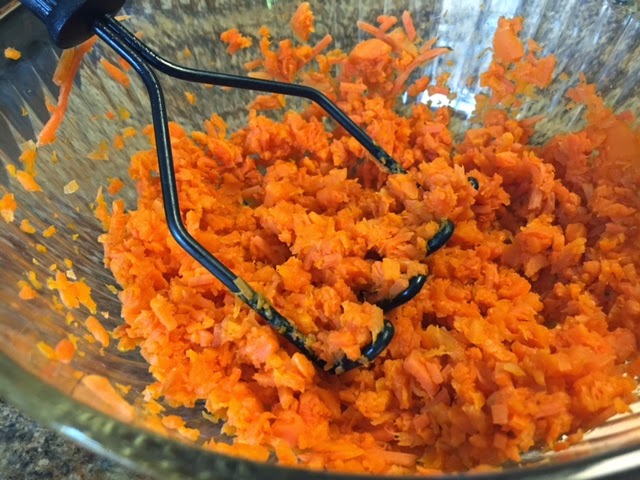
You can see from the photo that the carrots don't need to be pureed; just mashed. Some carrot bits in there are good.


After the dough is mixed, I drop it on the cookie sheets (using two spoons) in about 1 1/2 Tbsp.-sized mounds. Although I have multiple cookie scoops (and LOVE them), for this recipe I like the look that the cookies have when they are dropped on the cookie sheet. They look a little too round and perfect if I use a cookie scoop, and I want them to be a little more rustic. There's carrots in them cookies: rustic is good.
Look at all those yummy bits sticking out!

While the cookies are cooling on the rack, I make the orange glaze. This stuff is good. Have you ever had those pre-packaged orange rolls that you pop out of the can and put in the oven? (I admit that those are a favorite of mine). Well, the orange glaze is like the glaze that comes with those rolls, except better. You'll notice the recipe for the glaze includes "strong orange juice." That was how it was written for me by my sister (who copied the recipe for me years ago as part of a wedding gift). I use frozen orange juice concentrate (thawed of course). That seems to give it a nice orange flavor, as does the fresh orange zest you use in the glaze.


And now without further ado:

(Printable Recipe)

Orange-Carrot Cookies

(makes 3 dozen)

3/4 c. shortening (don't use butter or margarine)
1 c. mashed cooked carrots (about 2-3 cups raw)
1 c. granulated sugar
1 egg
1 tsp. vanilla extract

2 c.all-purpose flour
1 tsp. baking powder
1/2 tsp. salt
  1. Preheat oven to 375 degrees Fahrenheit. 
  2. While oven is pre-heating, cream the shortening and sugar in a medium bowl. Add the egg and beat until light yellow in color (about a minute using a hand mixer). Add the cooked carrots and vanilla and mix well. 
  3. In separate bowl, sift together the flour, baking powder, and salt. Add these dry ingredients to the wet and mix until just combined. Mix in the walnuts (if using them).
  4. Using two small spoons, drop little mounds of dough (about the size of 1 1/2 Tbsp) a couple of inches apart on a parchment-lined cookie sheet. Bake for about 12-15 minutes (time will depend on oven and size of cookie). You do not want these to get overbaked; they should just be turning golden on the edges, and should  be puffy when done.
  5. Allow to set on the cookie sheet for one minute before transferring the cookies to a cooling rack. 
  6. Glaze the cookies with the orange glaze while still warm (but not piping hot); you can place paper towels, foil, or parchment underneath your cooling rack to spare your counters. I dollop a little spoonful of glaze with a spoon and let it drizzle down the sides.  

Orange Glaze

1 c. powdered sugar
2 Tbsp. strong orange juice (i.e. use some thawed frozen concentrate if possible)
1 pinch of salt
the zest of an orange (you can add more or less to suit your taste)
  1. Combine all ingredients together and mix. The consistency should be somewhat runny, but should still coat the back of a spoon. This is a glaze, not a frosting. Add more juice if necessary.

And that's it! You're all done! Now enjoy the delicious fruits...and vegetables... of your labor!


Yummy in my tummy!