Wednesday, May 27, 2015

Happy Fox is in the Shop

I currently have this cute little guy in my etsy shop. He is made out of corduroy, wool felt, and cute woodsy printed flannel. His limbs have been double stitched so that he's durable. And his face is hand-embroidered. I will make more as I have some left over corduroy. I also have some fabric to make a cute little girl fox.


I had a lot of fun making this little fox. I don't know what it is about making little stuffed toys. It makes me happy to see them come to life. 

If you're interested, here is the link to the shop:

Tuesday, May 26, 2015

Memorial Day Strawberry-filled Cupcakes

We had a family barbecue yesterday for Memorial Day. It was the first one we've had in quite awhile as my parents have been out of the country for 3 years. It was a beautiful day and it was wonderful spending time in my parents' lovely back yard. It was complete with water balloon fighting, swimming for the brave (the pool can be cold) and croquet playing. My dad killed everyone else on the croquet field.

I was assigned to bring a couple of side dishes, one of them being dessert. I wanted to make something patriotic, and this is what I came up with. These, along with my younger sister's amazing lemon bars made from the lemons on my parents' tree, were a hit.

You've got the red; you've got the white, and you've got the blue. And you've got some sugar. Just a bit. (As a side note for those who caught the reference to Frank Castanza, Seinfeld is coming to Hulu this summer. Yay!)

I made vanilla cupcakes with vanilla American buttercream frosting, but secretly hidden inside.....was strawberry cream cheese whipped filling!


They were the perfect fruity dessert for a perfect Spring evening. The cupcake and frosting recipe came from my new favorite baking cookbook, given to me by my older sister:

The Back in the Day Bakery Cookbook


It is a bakery in Savannah, Georgia, and so far all the recipes I've tried have been amazing. This cupcake recipe has a method for mixing that I have never seen before. Almost like a pastry dough since you add the butter to the dry ingredients and mix before pouring the liquid ingredients in. It made for a light, fluffy cupcake.

For the filling, I pureed strawberries, added them to smooth, whipped cream cheese, and folded in some whipped cream. Then spooned it into little holes I cut out of the cupcakes. I made the holes by cutting a cone shape out of the cupcake top, and I carved out a little more by using a small melon-baller to remove a little extra cupcake to make room for more filling. And don't worry, those melon-ball sized cupcake bits did not go to waste. They found their way into bellies.


Then I piped on the delicious vanilla buttercream, added some sugared strawberries and some blueberries, and wallah!: tasty patriotic cupcakes to celebrate Memorial Day.


Strawberry Cream Cheese Filling
1 16 oz. bag frozen strawberries, defrosted and then pureed in food processor
1 Tbsp. lemon juice
1/4 cup sugar

8 oz. cream cheese, room temperature
1/4 cup sugar
1 tsp. vanilla

1 cup heavy cream
1/4 cup powdered sugar

1. Add the pureed strawberries, lemon juice, and 1/4 cup sugar in a saucepan and cook and stir over medium heat until mixture comes to a simmer. Simmer for a minute. Remove from heat at allow to cool to room temperature. You will have about two cups of pureed strawberries. 

2. With a paddle attachment in your mixer, beat the cream cheese on medium speed until smooth. With the mixer turned to low, add the 1/4 cup sugar and vanilla until well combined. 

3. Pour one cup of the strawberry puree mixture into the cream cheese mixture and mix on low speed until well combined. 

4. In a separate bowl, (I used hand mixer), beat the whipped cream until it starts to thicken. Slowly add the powdered sugar and beat on high speed until the whipped cream holds stiff peaks. Fold in the whipped cream into the strawberry-cream cheese mixture (I do this with a large whisk). Spoon or pipe the filling into your cupcakes. 


It was definitely a memorable day!


Photos of the yard are courtesy of my little sister. And yeah, my dad made that cool treehouse. He's awesome like that.

Wednesday, May 20, 2015

pom-pom tail for the giraffe

I wanted to show you how I make the pom-pom tail for the giraffe soft toy. I experimented with time-lapse photography. While I can't guarantee that the video is beautiful, it is interesting to watch. Sorta. Here are directions and time-lapse video to show you how to make the pom-pom tail for the giraffe rag doll/softie. Or you can just make a bunch of pom-poms and hang them on things. That's fun too.


 How to make the pom-pom tail:


1. Cut two identical circle donut shapes out of cardboard or cardstock (use a craft knife to cut middle circle out). If you want your pattern to last longer, use cardboard. My donuts are about an inch and a half in diameter. Make yours larger or smaller depending on how big you want your pom-pom.


2. Cut 3 pieces of yarn about a yard in length each. With the two cardboard donut pieces together, begin wrapping all 3 pieces of yarn through the hole and around the outside of the pattern pieces. Continue wrapping all the way around the circle. 

3. After the yarn has been fully wrapped around the two donut circles, use a small pair of sharp scissors to cut the yarn. Cut it along the top edge of the donut, in between the two cardboard pieces. Do not take the cardboard pieces off yet.

4. Cut three 18 inch pieces of yarn from the skein. Take one strand and fit it into the space between the two donut cardboard pieces. Make sure you have an even amount of yarn on each side of the pom-pom (9 inches ). Tie the yarn tight once, and then double knot it. Repeat with the second and third strands of yarn.

5. There should be six (9 inch) strands hanging off the pom-pom. Combine the strands so that you have 3 pieces made up of two strands of yarn each. Braid the 3 together until you have a braid 2-3 inches long. Double knot the end of the braid and cut off the excess yarn. Now you have the pom-pom tail!

And that's a wrap!

Tuesday, May 19, 2015

Happy Day Oreo Cake

My baby is 2! She's a whole lotta personality and spunk crammed into a little body. A body that still toddles quite a bit. She'll eventually learn to walk normal, right? I wanted to make her a birthday cake that she would absolutely love.

Last year when I made her a vanilla birthday cake with sprinkles, piped with enticing pink rosettes, she cried and pushed the cake to the edge of her high-chair tray. I was envisioning her sticking her face in her own little cake (as her mother had done at that age....and is constantly reminded of....), but she just wanted it out of her sight. I guess it was the first time she had had cake, and everyone staring at her and singing to her might have been a little overwhelming.

Since cake is no longer a novelty for her, we had better luck this year.....except she tried to touch the lit candle. But she smiled through being sung to and ate a piece of cake like a pro this year. And used a fork to boot.

Now, the Bean (her nickname) has recently been introduced to Oreo cookies, and she loves them. She takes her time eating them, and I am at awe since I can eat many a cookie to her 1. So in thinking about what cake to make, an Oreo cake seemed like a great idea.


There are lots of recipes for an Oreo cake on the internet, and Oreo frosting. And many look very appetizing. But I decided to make a recipe from "The Joy of Cooking;" that book has never steered me wrong. Now, there isn't an Oreo cake recipe in there, so I adapted the recipe for their basic chocolate cake, with delicious results. There are Oreo cookie crumbs in the batter, and a whopping 6 oz. of chocolate in this cake, because you can almost never have too much chocolate.The cake is moist and chocolate-y and there are little bits of Oreo goodness inside.

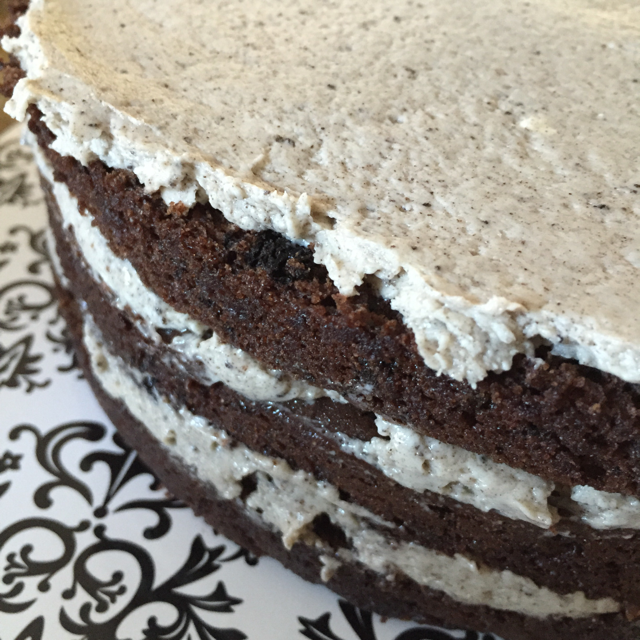
I cut the cake into four layers, and frosted the inside with 3 layers of decadent Oreo butter-cream frosting. And when I say butter-cream, I mean the real butter-cream. The kind which requires a candy thermometer and a stove (don't be intimidated; not as hard as you think; just more time). Not that I mind mixing butter and powdered sugar together with cream and vanilla. That is delicious too, but I wanted to go for something different this time, and I was not disappointed.


For some reason on birthday cakes, I go all out. The outside of the cake is covered in chocolate fudge frosting (yes, stove-cooked fudge envelopes this entire cake). So yeah, it's rich. And nestled in the fudge is some more Oreo cookie crumble magic. Hey; you only turn 2 once.


If you love chocolate and Oreos, this cake will definitely satisfy, and well, if you don't....there might be something wrong with you. Seriously. I'm just saying...

So make this for a celebration, or just because. But if you make this cake, it will be a special day. In the words of my 2-year old little Bean, "Happy Day!"

It might be important to tell you here that I did not make this cake all in one day. That would be toooooo much work on the birthday. I split up the days and times I made each of the components. That made the whole process much less daunting and it didn't seem like too much work for such a delectable, from-scratch cake.

I made the cake a few days ahead of time and after it cooled, I wrapped it well with plastic wrap and placed it in the freezer. Then before frosting the layers of the cake, I pulled it out about an hour before, unwrapped it, and sliced it. Freezing it has an added bonus of improving the texture/moisture of the cake, and makes it easier to slice. Score!

I also did the frostings at different times. When I was ready to frost the cut cakes, I made the Oreo buttercream frosting, frosted the middle layers, covered the cake with plastic wrap again and placed it in the fridge until I was ready to make the fudge frosting. You could probably do this step a day ahead of time if you have the space to spare in your fridge.

Lastly, I made the fudge frosting. Most of the time involved in making this frosting is waiting for the fudge to come back down to 110 degrees F after it has been cooked. So make sure to give yourself time to make this well in advance (a few hours) of any gathering the cake might be involved in. Then you can frost the cake, place it back in the fridge and pull it out when needed.

When you pull the cake out in front of guests, you will feel like the super baking star that you are. You will hear oooh's and ahhhh's and "did you make that?!"

And the work you put in to this cake will most definitely be worth it. Because there's almost nothing worse than spending a lot of time and effort into making a cake and then after tasting it thinking: "eh....I might as well have used a box cake." No, you will not think that at all. My sister says this cake tastes "amazeballs." That's an honorific title. So now....the recipe:

Happy Day Oreo Cake

One 9-inch layer cake

Cake
You want all ingredients at room temperature, or about 70 degrees Fahrenheit. 

6 ounces unsweetened chocolate, chopped
1/2 cup + 2 Tbsp. milk
1 cup packed brown sugar
1 large egg yolk

2 cups sifted cake flour
1 tsp.baking soda
1/2 tsp. salt

1/2 cup milk
1/4 cup water
1 tsp. vanilla

1/2 cup (1 stick) butter
1 cup sugar
2 large egg yolks

13 crushed Oreo's (I put them in a freezer bag and took a rolling pin to those babies)
2 Tbsp.flour

3 large egg whites


Directions
1. Preheat oven to 350 degrees Fahrenheit, with rack in the middle. Prepare your 9-inch cake pans by greasing them, and placing a parchment round on the bottom of each pan. I trace the bottom of the pan on parchment paper and then cut it out with scissors. 
2. Place the chocolate, milk, brown sugar and egg yolk in a double boiler. You can use a bowl over a pot of boiling water, as long as the bowl doesn't touch the water. Cook and stir until the chocolate mixture is smooth and slightly thickened. Take the bowl off the heat and allow to cool to room temperature. 
3. In a small bowl, mix together the flour, baking soda and salt.
4. In a liquid measuring cup or small bowl, mix together the 1/2 cup milk, water, and vanilla. 
5. Add the 2 Tbsp. flour to the crushed Oreo's in a bag and shake it to coat the crushed pieces. 
6. Place the 1/2 cup butter in the bowl of a stand mixer attached with the paddle attachment. Beat on medium-high speed for about 30 seconds. Scrape down the sides of the bowl. With the mixer on medium-high again, slowly add the sugar and mix until very light and fluffy. This takes about 4-5 minutes. Add the egg yolks one at a time and mix until combined. 
7. With the mixer on the lowest speed, add 1/3 of the flour mixture to the butter/sugar. When that is incorporated, add half of the liquid (milk, water, vanilla). After that is incorporated, add another third of the flour mixture, followed by the last of the liquid, and then the last portion of the flour. Mix until just combined. Over-mixing will make the cake texture tough. 
8. Stir the cooled chocolate mixture into the batter. Then stir in the Oreo crumbs into the batter. 
9. With clean beaters (I use a hand mixer on highest setting), beat the egg whites in a separate bowl until stiff, but not dry. Fold the egg whites gently into the batter (I actually use a large wire whisk to do this. I find it works better than folding the whites in with a spatula).
10. Divide the batter evenly between your two prepared cake pans, smoothing the tops. Bake until a toothpick comes out clean, or with a few moist crumbs. This takes about 30 minutes. Begin testing at 25 minutes to ensure you don't over-bake the cake. 
11. Remove the pans from the oven and place the pans on a wire rack. Allow to sit in the pans for 10-15 minutes. Then run a thin knife around the edges of the cakes and remove them from the pans. Place the cakes on the wire rack to cool completely. If you are using the cake that day, place the cake in the fridge (securely wrapped) for about an hour to make slicing the layers easier. If you are not using the cake that day, wrap it securely in plastic wrap and place in the freezer. When ready to use the cakes, pull them from the freezer and allow to thaw for about an hour. Then you can slice the layers.
12. Slice each cake horizontally in half, creating four layers. 

Oreo Buttercream Filling
Have all ingredients at room temperature (about 70 degrees Fahrenheit)

1 cup sugar
1/2 cup water
1/4 tsp. cream of tartar

2 large eggs

1 1/2 cups (3 sticks) unsalted butter, softened

1 tsp. vanilla
1/3 cup (or more to taste) crushed, fine Oreo cookie crumbs


1. Combine the sugar, water and cream of tartar in a heavy-bottomed saucepan and while stirring,  cook over medium heat until the mixture begins to simmer. Stop stirring and cover and allow to simmer for 2 minutes. Uncover and wash any sugar crystals down off the side of the pan with a wet pastry brush. Cook, un-covered, until thte syrup registers 238 degrees F (soft-ball stage) on a candy thermometer.
2. Meanwhile, fill a wide deep skillet with 1 inch of water and bring to a simmer.
3. (While syrup is cooking) In a medium heat-proof bowl, place the eggs and beat with a hand mixer on high speed until thick and pale yellow. Set aside until syrup reaches 238 degrees F.
4. Just before the syrup is ready, begin beating the eggs again on medium speed. While beating, carefully pour the hot syrup into the bowl of eggs (avoiding the beaters) in a thin steady stream. Once the syrup is incorporated, set the bowl in the skillet of simmering water. Stir constantly with a whisk until the mixture registers 160 degrees F on the thermometer. Remove from the heat.
5. With clean beaters, beat the mixture until it cools to room temperature. This will take a couple of minutes.
6. Add the butter, 1 tablespoon at a time, until the mixture is smooth and spreadable. If the mixture gets too soupy, refrigerate it for a few minutes, then resume beating. 
7. Add 1 tsp. vanilla and the crushed Oreo crumbs until combined. Lick the beaters. Grab a small spoon and eat another bite. Ok, now stop there so that there is some left to frost the cake with. Refrigerate until ready to use, or use immediately. 

Chocolate Fudge Frosting

2 cups sugar
1/8 tsp. salt
1/2 cup half-and-half
1/2 cup heavy cream
1/4 cup light corn syrup

6 oz. bittersweet or semi-sweet chocolate, chopped (or use semi-sweet chocolate chips)

2 Tbsp. butter, softened
1 tsp. vanilla

1 Tbsp. half-and-half + more if needed for desired consistency

1. Combine the first five ingredients in a heavy saucepan and stir over low heat until the sugar is dissolved (about 5 minutes). Then stop stirring and bring the mixture to a boil over medium heat. Boil for 1 minute without stirring it, then remove from the heat. 
2. Add the chopped chocolate and stir until it is completely melted and the mixture is smooth.
3. Brush the sides of the pan down with a pastry-brush dipped in warm water. Place a warmed candy thermometer (run it under warm water for a bit) into the pan, and cook the mixture over medium heat without stirring until the mixture reaches 238 degrees F (soft-ball stage). Remove from the heat.
4. Place the butter and vanilla on top of the mixture, but don't stir it. Cool the candy to 110 degrees by placing the bottom of the pan in bowl of cold water to stop the cooking. 
5. Ween it is cool, stir the fudge in the pan with a wooden spoon until it "snaps" (meaning it begins to lose its sheen). Or do what I did and pour the fudge into the bowl of your stand-mixer and with the paddle attachment, mix on low-speed until it snaps (loses its sheen). This can take anywhere from 5 to 15 minutes.
6. Once the mixture loses its sheen, add the Tablepoon of half-and-half and mic until combined. Turn the mixer off and let the mix sit for a few minues (5-10) to thicken. Check after this point to see if you want to add more half-and-half (a teaspoon at a time if needed) to make it spreadable. You may not need to add any more at all. Use it immediately to frost the cake. If you can't use it immediately, place plastic wrap on it. You will have to soften it again (heating it) and stir it until smooth before you use it. 


Assembling the cake:
Slice each layer of cake in half horizontally, creating a total of 4 layers. Place the bottom layer of cake on a cake plate and frost with a third of the Oreo buttercream frosting. Top with another layer of cake and another third of the buttercream. Repeat with another layer of cake and the last of the buttercream frosting. Top with the top layer of cake. Frost the entire cake with the fudge frosting, saving some to pipe from a pastry bag on top later (if desired). Crush some Oreos and press the crushed pieces into the top and sides of the cake. And you're done. Yay!

Now go eat some cake!

Wednesday, May 13, 2015

putting your ragdoll/softie together: part 2 (embroidering face)

We left off in the last rag doll post (see here for previous post on putting together your rag doll, and here for free pattern for basic doll) of this tutorial at getting ready to embroider the face of the doll or giraffe (depending on which pattern you are using). If you have never embroidered before, don't be intimidated by this pattern. The embroidery is rather simple, and you can totally do it.

So grab your partially assembled doll and let's go. You should already have the head pieces and the body pieces sewn together and pressed. To embroider the face, you will need:

  • Six-stranded embroidery floss (DMC) for the eyes 
  • DMC floss for nose/snout (use 4 of the 6 strands) 
  • DMC floss for the mouth (use 4 of the 6 strands)
  • embroidery needle (I used size 5 needle)
  • Disappearing ink pen
  • Optional: small embroidery hoop

For the basic doll, grab the pattern-piece for the head and place your front-head/body piece over the top of it. You should be able to see the face from the pattern through the fabric. Using the disappearing ink pen, draw directly on the fabric, tracing the lines showing through the fabric from the pattern piece.

Once you have the face drawn on, you are ready to embroider on the lines you traced. Thread your needle with about 18 inches of floss for the eyes, using all six strands. Knot the end of the strand of floss. If using an embroidery hoop, put it on the head-piece now. Beginning on the right side of the circle, and about half way up one of the eyes, bring your needle up through the fabric on the line you traced. You will be outlining the eye using the embroidery stitch called the backstitch. Find instructions from the DMC website here. You will be stitching from right to left, or counter-clockwise. 
image from dmc-usa.com
The last stitch in outlining the eye will go down into the fabric directly where you began the needle. Do not tie-off the floss because you will fill in the outline using the satin stitch. Use the dmc link above again to read about the satin stitch. It is a stitch used to fill in spaces. Make sure to stay-stitch at the end. 

Repeat the process for the other eye. 

In stitching the nose and mouth, you will only use 4 of the six strands of the embroidery floss. Stitch directly on the lines you traced, making sure to stay-stitch at the end. You can use the backstitch again, but I prefer to use the split stitch. It is similar to the backstitch, but you bring the needle up in the middle of your last stitch, which splits it.

image from dmc-usa.com


After the face is embroidered, I like to press it with the iron. This will set the stitches and also press your fabric flat again after it has been in the embroidery hoop. 

I like to add pink cheeks to the doll-face. I don't know if this is how other doll-makers do it, but I'll tell you how I do it. I use a pink pastel-chalk; I bought it from an art store. I color the tip/pad of my pointer finger (on my dominant hand) with the pastel. Then I smear my finger on the fabric in a circular motion. I usually have to do this a few times to get the shade and even color I want. 


Now your doll has rosy cheeks!


If you are making the giraffe doll, you will embroider the snout piece first (felt). Using the disappearing marker, draw the nostrils on the snout piece of felt. For the snout, you will use 4 strands of your choice of colored embroidery floss. Start by cutting a length of floss about twelve inches long. Separate two of the strands from the 6, as you will only be using 4 strands (like in the basic doll above). Stitch the nostrils using the split stitch. I used the split stitch on the snout for the nostrils and for the mouth, using 4 strands of floss on the mouth as well.


After the snout is embroidered, place the snout on the front head piece, using your pattern as a guide of where to place it. Pin it in place. Then thread a needle with either matching thread or embroidery floss (two strands) to hand-sew  (whip-stitch) the snout on the face with about 1/16 inch seam allowance. Leave about an inch un-sewn at the bottom of the snout to stuff later, but make sure you end with a stay stitch still. Press with an iron to set your embroidery stitches.


With the snout sewn on, now add the eye patches (once again using the pattern piece as a guide) and pin. I use the machine to stitch them on the face, but you can hand-sew those on too if you prefer.


Now that the eye-patches are attached, it is time to embroider the eyes. Using the disappearing ink pen, draw the eye shape on to the felt eye-patches. I use all 6 strands of floss and use the backstitch (see above) to outline the eyes, and the satin stitch to fill them in. I then embroider (using all 6 strands of a piece of white embroidery floss) a french knot in the upper right portion of each eye. Here is the link again to the embroidery stitches: http://www.dmc-usa.com/Education/How-To/Learn-the-Stitches/Embroidery-Stitches.aspx

image from dmc-usa.com
This makes the eye seem to sparkle a bit. You could add it to the basic doll face as well.


The doll is starting to get a little personality of it's own! Doesn't that make you happy? It makes me happy.

In the next rag-doll post here, I'll go over sewing the limbs, stuffing them, and putting the doll together. Yay!!

Monday, May 11, 2015

My Mother's Day Gift

Yesterday was, of course, Mother's Day. I wanted to give my mom something memorable. But what? It had just been her birthday, and I was low on ideas. And then it came to me...

What gift has the power of recalling the days when you were young and cute? The power of eliciting sentimental tears? And then......BAM! Makes you laugh out loud out of nowhere?

How about this beauty of a gift from your thirty-something year-old daughter: 


When I brought the gift over, she thought it was from one of my kids at first. But then she saw my handprints and giggled. Silly. And then she read the poem. I started getting worried when she started tearing up and said I was making her cry. I thought "oh no; stop reading now!" And then she burst into laughter. Phew. Best Mother's Day reaction ever. 

Her first words after that?: "That's so Kim." And then told me how she used to worry that my older brother had corrupted her sweet little feminine girl into something crude by his bad example. But now she knows it's all me. I don't know what to make of that. Either way, I think I made a memorable Mother's Day gift, and as an added bonus, my artwork made it onto the fridge. Right next to the grandkids' art! Yup, my momma's proud of me. 

I did make a little felt brooch too, lest you think I only give inappropriate poems as gifts.

Thursday, May 7, 2015

Actual Cinnamon Rolls? Seriously?


So......after two posts and lots of writing (and baking, and eating) of/about cinnamon roll bread recently, and how I wanted the taste with less effort than actually making cinnamon rolls...my 11 year old daughter (remember her from the yeast toot story?) called me from school yesterday to inform me that she volunteered me to bring at least 35 cinnamon rolls to her class this morning. I am not joking. They've been doing state testing all week, and before they start their test, they get a treat.

Now, I basically think that when you become a parent, these types of moments come with the gig. Like how a few weeks ago she told me at 4 pm that her state project was due the next morning. But honestly, that rarely happens with this kid. She's super responsible when it comes to school work.

Anyway, I was busy and didn't get home until late. So...to make cinnamon rolls late at night or early in the morning? Ugh. I chose morning, even though I'm pretty much semi-catatonic until noon every day. And I couldn't buy these things, because she promised her class home-made rolls. And she talked them up. So there are expectations here. Yes, they're the expectations of 11 year-olds, but still, expectations. So all the cream cheese and bread flour and sugar (that I made sure I had on hand when developing the cinnamon roll bread) has come in handy. And even though I've made countless loaves of the bread in an effort to not have to go to the effort of actually making cinnamon rolls, it looks like I had to end up making the real deal (40 of the real deal) anyway. Man, I had to get all fancy and stuff and actually make frosting and physically frost each roll. Sigh. I guess I'm lucky to have such problems. You're welcome Go-lie (11-year old's nickname). I love you.

And in case you want to know, I used this recipe.

Wednesday, May 6, 2015

sock bunny?

What do you do when your blonde-haired angel-faced 6 year-old niece wants you to make bunnies in a little basket like the ones Grandma has? Well I'll tell you what you do: you run over to Grandma's (your mom) house to snap some quick pictures of these little sock bunnies.

Now....I have no idea how to make these. I remember being enamored by them when I was a child. And funny enough, my mom can't remember how she made them either. It was back in the days when she sewed, and she's outgrown that now. Does that mean that someday I'll outgrow this crafty thing? Hmmmm. We'll see I guess. 


So if anyone out there has some suggestions for me,  I'd appreciate it. Because not only does she look like an angel, but my niece is pretty darn sweet as well, and I don't want to disappoint her. I'm sure Pinterest can help me out too. I'll keep you posted. 

Tuesday, May 5, 2015

Heavenly Cinnamon Roll Bread

I have made fire! No, not really. But I have figured out how to make a loaf of bread that looks deceptively simple on the outside, but once you slice it there is a treasure of cinnamon and cream cheese sweet ooze in the center. Cinnamon roll bread! With the frosting in the middle. Need I say more? Even better yet, it is much simpler to make than actual cinnamon rolls (hence my desire to make it). Cinnamon roll texture and flavor that is easy to make? Yes, please!

(to see my first fail at making this bread see here).


It is slightly less sweet and rich than eating a large cinnamon roll loaded with cream cheese frosting on top, but the taste is the same. And the bread itself is dense, sweet, and delicious. It can stand up to the cinnamony goo rolled in the center, and you get bits of cream cheesy-goodness in each bite. It has the perfect ratio of cinnamon and cream cheese to the bread, so you don't feel sick after eating it (like you sometimes do after eating a cinnamon roll loaded with yummy frosting). What? Me getting sick of too much sugar?! Yes, it rarely happens, but it can.

The key to the dough is making sure you don't add too much flour when kneading so that it doesn't dry out and become tough. And then kneading it long enough to form a satiny-smooth looking dough.

The satiny and supple feel of the dough comes from the gluten (protein) strands that are formed when it is kneaded properly. Don't worry, though, hand-kneading is only optional. I used my Kitchen-Aid for kneading this bread. The recipe also uses bread flour instead of all-purpose flour. Bread flour has more protein in it than all-purpose flour and develops gluten strands more readily (that gives the structure to the bread, gives it that nice springiness and helps it to not dry out). You could probably use all-purpose flour still, as I doubt this loaf is going to last long enough to dry out. Now some of you may be wondering: "isn't gluten a bad thing?" My answer as a dietitian and home baker is: "NO!" Not unless you have a bonafide and diagnosed case of Celiac Disease, which if you do, you're probably not reading this right now anyway. Gluten does not make you fat or unhealthy. It's a necessary protein in many foods, bread being the main food. But once again, I digress..... back to more delicious topics...

I have used instant yeast in this recipe, which is different than active dry yeast. The reasoning behind this being that with instant yeast, I can save a little time because I don't have to worry about proofing the yeast first. With active dry yeast, you usually add the sugar to the warm liquid in the recipe and mix in the yeast. Then you wait 5-10 minutes for the yeast to "proof," which just means it gets all bubbly and flatulent. Yes, you read that correctly: I said 'flatulent;' yeast toots if you will. Yeast is alive, after all. And as my oldest daughter told me while she was in her preschool days: "Everyone toots, Mom. You just say excuse me and move on." Her wise pre-school teacher taught her that. Apparently there was a widespread break-out of toots in the class (imagine that), which caused eruptions of giggles that would disrupt learning. Okay, okay, back to the topic...

You can tell if your yeast is tooting when it gets frothy and forms a foam. Yay! Now it's proofed and activated, and you can move on to adding the other ingredients. I will give directions for both ways (instant and active dry yeast) in this recipe although I highly recommend getting instant yeast. I value those ten minutes it saves me. It somehow makes the thought of making bread less daunting. I find mine in the bulk section of my grocery store.

Once it is kneaded long enough (about 5 minutes by mixer on a low/medium speed--I use speed 2 on my kitchen-aid and the dough hook), form the dough into a ball and place it in a greased bowl to rise. I turn it over once in the greased bowl so that the top gets greased (so as to not dry out). Then place a clean dish towel (I get it a little damp--once again so the dough doesn't dry out) over the top of it and let it rise until puffy, and when you press your finger in it, it leaves a little dent (meaning it doesn't spring back). The timing of this depends on the temperature of your kitchen. It can take an hour or longer. However, I don't like waiting. So when I start making the dough, I turn my oven on for exactly one minute and thirty seconds, and then turn it off once my timer goes off. That will get my oven nice and warm (but not too warm) to aid in the yeast tooting...er, I mean the dough rising. Then I place the damp dish towel on top of the bowl and place it directly in the warm oven. It usually takes about 30-40 minutes for the dough to rise enough (almost doubled in size).


After the first rise, the dough is ready to be rolled out. Almost. Spread a little flour on your work surface. Then dump your dough out. I pat it down into a rectangle. Then I cover it with the towel again to allow it to rest for ten minutes (so the gluten strands will loosen up a bit again) so it will roll out nicely for me later. Every time you man-handle the dough, the gluten strands will get super springy again, and if I tried to roll it out right away, it wouldn't hold it's shape, and would spring back a bit. So waiting for a few minutes is a good thing.


Now what to do while you wait ten minutes....Make the fillings! There is a cream cheese filling and a cinnamon-brown sugar filling. I start with the cream cheese filling. Ideally, your cream cheese will have been sitting out to soften for a little while. But it's not a huge deal if you forget to set it out. Mix the cream cheese and sugar together with a hand mixer until very smooth. Then add the vanilla and mix it until all combined. Set it aside.


In a separate bowl combine the ingredients for the cinnamon filling. It will look crumbly when it's mixed. Ok, now let's assemble our cinnamon roll loaf!

Roll out the rectangle of dough to around 9 inches x 20 inches. The dough will be a little thicker than 1/4 inch when rolled to this size. Now spread the cream cheese filling over the dough. Leave a couple of inches uncovered on the end of the rolled out dough (to be able to seal the loaf after we roll it). Then sprinkle the cinnamon filling on top of the cream cheese mixture and pat it down.


Now starting from the end where the filling goes to the edge, begin to roll it up! Then seal it, seal the ends of the loaf, and place it seam-side down in a greased loaf pan. Cover it with a dish towel and allow to rise until the top of the loaf is about 1/2 inch to an inch above the rim of the loaf pan (about a half hour). And now the hard part is all done. Yay.


Once the loaf has risen, preheat your oven to 325 degrees Fahrenheit, with the rack in the lower third portion of your oven. Once it is pre-heated, place the loaf on the rack in the oven and bake for 55-65 minutes. You don't want to under-bake this as it will be doughy in the middle. The top of the loaf will get fairly brown, but having the loaf in the lower third of the oven will help it not get over-browned. Then allow the loaf to cool on a rack (if you can wait!) and enjoy!!!!


printable recipe here

Heavenly Cinnamon Roll Bread

Bread Dough:
¾ cup milk, warmed (no hotter than 110° F)
1 ½ tsp. instant yeast (if using active dry yeast, use 2 ¼ tsp)
¼ cup butter, melted
1 egg
¾ tsp. salt
2 ½ - 3 cups of bread flour (use just enough for the dough to come together without being too sticky)


Directions:
1.  Add the warmed milk, melted butter and sugar in the bowl of a stand mixer. Sprinkle the yeast in and mix. If using instant yeast, you may progress with the rest of the instructions. If using active dry yeast, allow mixture to sit for about 10 minutes until it develops a frothy foam on top. Then you can proceed.
2.   Add the egg, 1 ½ cups of the flour, and salt to the bowl. Using the paddle attachment, mix on medium speed until the mixture is smooth, about 30 seconds. Remove the paddle attachment and attach the dough hook.
3.  With the mixer on low speed (1-2 on a Kitchen-Aid), add enough flour until the dough comes together and is not too sticky. I usually use a total of 2 ¾ cups of bread flour. Continue machine kneading (with the mixer on a 2 if using Kitchen-Aid) for 4-6 minutes and dough is satiny smooth and has a sheen.
4.  Form dough into a ball and place in a greased bowl, turning it once in the bowl to coat the top in the oil. Cover the dough with a dish towel, place in a warm place, and allow to rise until almost doubled (about an hour or so).
5.  Once dough has risen and the imprint of your finger stays when you push on the dough, dump it out on a lightly floured work surface. Shape into a rectangle and pat down. Cover with the dish towel and allow dough to rest for 10 minutes.
6.  After resting, roll the dough out into a rectangle roughly the size of 9 inches x 20 inches.
7.  Spread the cream cheese filling over the rectangle, making sure you get it spread to the edge of the two long sides and one of the short sides. Leave a 2-3 inch strip on the other short side that is uncovered.
8.  Sprinkle the cinnamon filling over the cream cheese filling and pat it down.
9.  Roll up the dough starting from the short side that is covered by filling. Roll all the way up until you get to the unfilled section of dough. Lift the unfilled section up and seal the dough by crimping it with your fingers. Crimp the ends of the loaf together as well.
10.  Turn loaf over so the seam-side is down, and place in a greased bread loaf pan. Cover and allow to rise until it is about ½ inch over the rim of the pan, about a half hour.
11.  Adjust oven rack so that the loaf will rest in the lower third of the oven. Pre-heat the oven to 325° F. Bake loaf for 50-65 minutes, or until top is fairly browned, and the top of the loaf sounds hollow when you knock on it (and doesn’t squish). It is normal for the top layer of dough to separate some from the first layer of filling.
12.  Remove bread from oven and place on rack. Allow to cool for fifteen minutes. Remove loaf from pan and place on the rack to completely cool (if you can wait that long!) before slicing.
13.  Gobble it up!


Cream Cheese Filling:

4 oz. cream cheese, room temperature
2 Tbsp. sugar
1 tsp. vanilla extract

1.  Mix the cream cheese and sugar together with hand mixer until smooth. Add the vanilla and mix until combined.

Cinnamon Filling:

½ cup brown sugar
1 ½ Tbsp. ground cinnamon
¼ cup butter, softened
½ cup flour

1.  Combine all ingredients and mix using a hand mixer. The mixture will be crumbly.


I hope you enjoy this as much as my family does!