Tuesday, February 2, 2016

And here is doll quilt #2!

Here she is: the second doll quilt for my niece! I can't wait to see them both on her doll beds.


This one I did a tad different than the first. The first kind of looked like a sampler quilt and it kinda came together as I went (with not a ton of pre-designing), and this one looks more like a quilt you might see on a bed.
both quilts...taped to the wall. 


I had fun designing it. It required some math skills, though. And I didn't quite get the math right on the all the blocks the first time, so I had to do some of them multiple times. That part was a little frustrating, but at least I learned some quilt math skills along the way.
the original drawing/design of the quilt
It's gratifying to see something you have designed come to fruition. Even if it is just a mini quilt. You can see I designed it the old-fashioned way with graph paper and colored pencils.
I like the big center block with the little pinwheel in the center, set on the diagonal. That center pinwheel was one of the areas that gave me some trouble.

I highlighted the yellow fabric, since that is the color my niece requested.
A shot from the back
So....it's only almost a month after her birthday that they're both finished....And I'm sorry to say, that's not the latest I've been with a birthday gift....

But it's like the birthday joy continues, right? To get a present a month later? Sure!

Wednesday, January 27, 2016

Doll Quilt #1: Ta-Da!

I finally finished my niece's first doll quilt. The second is yet to come. Isn't this the cutest little quilt? Each block is a variation of a star block, and it was good for me to work on this because it allowed me to practice piecing new blocks (I've not made these types of blocks before), and to practice on my new sewing machine.

I can honestly say that it is so much more fun to sew on a nicer machine. The piecing of this quilt took longer than the actual quilting and adding of the binding. Hooray for small quilts that don't take long to quilt! I can see the appeal of mini-quilts now.

I decided to machine-sew the binding on. That is the first time I've done that, and I liked that it was done quickly, which means it will probably be done again.
these stitches look much nicer than the ones done on my old machine. Hooray for a built-in walking foot!

I love that tiny floral fabric, and that the quilt looks cute from the back, too

I quilted each block a little differently
I didn't want to over-quilt this because the pattern of the fabrics on the quilt-top is what I wanted to shine through most. So I quilted this mostly "in the ditch." I used matching yellow thread on the back (the bobbin thread), and a light gray on the front so that the fabric and patterns of the stars would be "the star"--see what I did there?-- and the quilting would melt into the background.


Cute, cute! Fun fun.

And bonus, when my niece grows up, she can use this as a fancy placemat. Ha ha.


Wednesday, January 20, 2016

Matching Baby Dolls for Twin Momma's-to-be

I am the proud new mama of......

a new sewing machine!! Yay! I graduated from my beginning Brother machine, which was great for my initial sewing purposes, but I have outgrown it. I have graduated to a Pfaff that has a built-in walking foot. So that's exciting. It also has an automatic presser foot lift option (with the needle in the down position) which comes in super handy when going slow around curves (like in the hair of the dolls below), or in quilting. That so far is one of my favorite things about it.

There is a learning curve when using a new machine, and I am definitely still trying to figure out mine. I christened it by making (what else) a couple of stuffed toys on it.

These are some little, stuffed baby boy dolls in diapers that were commissioned by my aunt. She has a friend who is pregnant with her first baby (a little boy). Her friend has an identical twin sister, and my aunt thought it would be fun to give her sister a matching doll for when she has her first baby too. Now that's some good thinkin'! And in case her first baby is a girl, these little dolls could be unisex if need be.


sitting with Big Bunny--don't mind the bits of fabric stuck in Big Bunny's fur
Their faces have been hand-embroidered, and their hair is made out of one of my favorite materials (in case you haven't noticed by now), wool-blend felt. I like using the wool-blend because it feels, looks, and holds up much nicer than craft (acrylic) felts. Look at all those colors. And I may just have a drawer full of more felt.....I just may...
look at all that felt!
The second toy is a custom cardinal (female, which is why she is brownish-tan) doll that is a teacher! Check out those little books. See where having felt around comes in handy? I made the inside of the books out of teeny cardstock boxes (I had to make my own patterns for that), and then embroidered the felt book covers and glued them on. I love little stuff. It makes me happy. I'm a weirdo. Anyway, this teacher bird is kinda cute, and she's little, so she makes me happy.


She is one of many dolls that I have made for a wonderful woman who wants to spread a message of love and acceptance. She uses these little cardinal dolls to tell a story. I will share more on that in an upcoming post!

Until later, folks!

Wednesday, January 6, 2016

Cutting fabric up and sewing it back together

That's pretty much what I've been up to lately. I cut fabric pieces up. Then I sew them back together. Sounds like crazy-talk.

I made a bunch of ornaments in my etsy shop for Christmas and did some custom orders, and even though I feel like I didn't do that much, I got burnt out. So, I haven't made a single stuffed toy for the last few weeks.

Plus, we've had some nasty colds over here, and I stayed in bed for a good few days after Christmas. What did I do while living in my bed those few days? I read a lot of quilting blogs. And decided I wanted to make some quilts. Now....I currently have fabric for quite a few quilts. Whether or not they get done is another story...

I found my new favorite online fabric store called Hawthorn Threads. Here is the website:
http://www.hawthornethreads.com/.

They have so many cute fabrics. I couldn't resist buying some. So that's how my interest in quilting got re-piqued.

Right as I got re-interested in making some quilts, my niece decided that she wants some cute doll quilts to go along with a doll bed she is getting for her birthday (TODAY!) for her 18-inch doll. Sounds like the perfect opportunity to do some fun new piecing of a mini-quilt or two! The bed she is getting is actually a bunk bed, which means she needs two coordinating quilts.

So my sister (her mother)and I went to buy some fabric last night. Here is what she picked out:


It should make for some pretty cute quilts, right? I am going to make some variations of happy star blocks out of half-square triangles. So right now I have a bunch of 2-inch half-square triangles.


I'll take some pics when the quilts are all done and post them. The quilts will be made up of 6 blocks, with each block having 16 of those little half-square triangle dudes. I haven't decided if I'll hand-quilt (with large perle 12 cotton), or just do a straight stitch on my machine. We shall see.

I had been playing around earlier with some of my scraps, and here are just 4 possibilities for 6-inch quilt blocks made from these little guys.
these 4 blocks are just 6-inches square


 Earlier last week I made up quilt blocks for this crazy, wonky log cabin quilt. Sorry for the bad lighting. It was night.

Now that the blocks are pieced, I'm not sure I like it. I did a method where I could make 6 blocks at once. So the quilt top came together quickly. Then, I decided I wanted to "quilt-as-you-go," because my machine doesn't handle bulk/big quilts very well, and the QAYG method is something I have wanted to try. I chose to do the method where I put the backing on the quilt last, and so I am just quilting through the quilt top and batting right now.

I'm not sure I like it, which means I'm losing interest, which means: who knows when it will get completed. Here are a couple blocks I've quilted. I have done a combination of hand and machine-quilting. I decided I hate how my machine quilts, even with a walking foot, and using nice (expensive) threads, and testing out stitch lengths. So....now I've decided I want a new machine. These things snowball...
This block is just hand-quilted

this block has both hand-quilting and machine-quilting
Weirdly enough, I enjoy the process of hand-quilting much, much, much more than machine quilting. Much.

So that's what I've been up to.

Oh yeah, and I made this little guy for a baby shower where the recipient is naming their baby "Sparrow;" so that just begged for me to make a toy sparrow. So I guess I did make a stuffed toy after all. I lied. Forgive me.


I hand-embroidered his eyes, and his tummy. He's got a cute little tail sticking out the back too.

So Happy New Year everybody! Hope 2016 goes great!


Tuesday, December 8, 2015

My Life: The Great Chocolate Chip Cookie Experiment

Don't worry, I'm not going to post the endless details of all the versions of chocolate chip cookies I've experimented with. And here is why:

MY LIFE has been The Great Chocolate Chip Cookie Experiment. Years and years of baking chocolate chip cookies. I have tweaked and re-tweaked recipes forEVER. I have eaten SOO SOOOOO many cookies. If I actually wrote the details of all the cookies I've tried, this would be a long book, not a blog post. And it would get cumbersome and boring.

I wish I could say I bake them all for my kids and family. But I don't. I bake them for me. Good thing I have kids to justify all the baking, "um, yeah, I am baking these for the kids. Sure..."

I have made all those versions out there on the Internet claiming to be the best, too. Including the New York Times version, the Serious Eats version, and many many many many others. If one of my sisters recommends I try a recipe, I also MUST try it. I cannot let it lie. I have a compulsion.

My original favorite recipe (years ago) was the kind that had vanilla pudding in the mix. Because they stayed soft. They're still good, but I've moved on.

I've tried browned butter (which sounds awesome, and I LOVE browned butter taste and smell) in cookies, but it didn't actually change the end-taste of the cookies compared to those with un-browned butter. So it is a lot of work for no added benefit.

I've cut up high-quality chocolate (instead of using chocolate chips), but in the end, chocolate doesn't chop so well and makes a mess when chopping, and using a good quality semi-sweet chocolate chip works just as well. Because part of the joy of chocolate chip cookies is the convenience in making them.

I've tried resting/chilling the dough, as well as baking right after the dough comes together. There is slight difference in flavor and a difference in appearance either way. But the awesome thing about the recipe I'm going to share is that it works well both ways: baked right away as well as baking after chilled. Baked right away, they have more of that rough appearance to them. I do like the texture slightly better once the dough has rested (and so do my kids), and the color is a nice toffee color, but the appearance is a little more smooth. But you're not going to disappoint anyone by giving them cookies that haven't been made with chilled and rested dough.

So here is how I like my chocolate chip cookies:

I like them to be crispy on the outside, and fudgy in the middle (believe it or not, melted butter helps them be fudgy). I'm not a fan of cakey chocolate chip cookies. They also MUST be made with butter. No margarine (gross). And NO shortening: not in chocolate chip cookies. No way. The butter and sugar caramelize together when baking to make this wonderful toffee-like buttery flavor. Yum. And I like a lot of vanilla, with a good balance of salt, and with baking soda to give it a slight rough/craggly look. And chocolate: good, semi-sweet chocolate. Luckily, Costco has a really good semi-sweet chocolate chip made with pure vanilla. They're awesome. And I haven't been able to go back to other chocolate chips (sorry Nestle) since. Also required of the perfect chocolate chip cookie: it must stay moist. I hate a dry cookie; it's so disappointing when you bake cookies and they end up dry the next day. That's where a higher ratio of egg yolk comes in to play in this recipe. And they cannot be flat. And they cannot be mountainous and cakey (I believe I already said that...). So that's a rough description of my perfect chocolate chip cookie.

And here is what they look like:


And yeah, they taste wonderful. And yeah, they stay soft and fudgy even the next day (if they last that long). And yeah, you're gonna love 'em.


You can get extra fancy if you want and sprinkle them with sea-salt once they come out of the oven.

I weighed the ingredients for these cookies. but I have also posted volumetric measurements so it is a more user-friendly recipe.

I adapted this recipe here.

Here is the recipe for these bad puppies:

My Favorite Chocolate Chip Cookies

12 oz. all-purpose flour (2 1/4 cups)
3/4 tsp. baking soda
3/4 tsp. fine sea salt (or table salt)
3/4 cup (1 1/2 sticks) butter, melted and slightly cooled--just not hot
7 oz. (1 cup packed) dark brown sugar
4 oz. (1/2 cup) white sugar
1 Tbsp. vanilla extract
1 egg + 1 yolk
8 oz. semi-sweet chocolate chips (2 cups)


1. Preheat oven to 325 degrees (**if baking immediately). Line baking sheets with silicone liners, or use parchment paper.

2. In the bowl of a mixer, and using paddle attachment, beat sugars (brown and white) and melted butter on medium speed until well incorporated (about 1 minute). Add the egg and one egg yolk and the vanilla extract and beat on medium-high speed until the mixture is light in color, about 3-5 minutes.

3. Meanwhile, sift or whisk together the flour, salt, and baking soda together in a bowl. Pour the flour mixture into the mixer with the sugar/eggs and with mixer on low speed, mix together until just combined (about 15 seconds). While there is still some white flour showing/not fully incorporated, add the chocolate chips and mix on low until just combined (about 15 seconds).

4. Place the dough in an airtight container and place in fridge for 8 hours, or overnight. You can keep it in fridge for up to 3 days. 

**Alternatively, scoop dough into rounds (I use a #40 disher) and place on cookie sheets, at least a couple of inches apart. Bake in 325 degree oven for 11-14 minutes, possibly longer depending on oven. The edges will be turning golden, and the middle will still look slightly moist/underdone. Take the cookies out and allow to cool on sheets for 4-5 minutes before transferring to a wire rack to fully cool. Store cooled cookies in an airtight container. 

5. When ready to bake chilled dough, allow oven to preheat to 325 degrees (give your oven a good 20 minutes to warm up). Place cookie dough balls (about the size of a walnut) on cookie sheet and flatten very slightly with the palm of your hand. Place in oven and bake for13-16 minutes, or until the edges are browned and the middle still looks very slightly underdone.  Take the cookies out and allow to cool on sheets for 4-5 minutes before transferring to a wire rack to fully cool. Store cooled cookies in an airtight container. 


ENJOY!!

They will have a slight crunch as you bite into them, and then a fudgy, gooey chocolaty center to die for. And they will taste of toasted buttery, chocolaty goodness. Mmmm.


These are seriously my favorite chocolate chip cookies I have made and/or tasted. And I've eaten and made a lot. I hope when we die there's not a counter in heaven showing how many cookies we ate in life. 'Cause if there is, I think all of heaven will line up to see the "girl who out-ate all other cookie eaters." Well, my sister and I might tie. 

Monday, November 2, 2015

Emoji Pillow Tutorial with FREE pattern: sewing is optional

Every Wednesday, I get together with the youth/girls from my church and we do activities. This week, they want to make emoji pillows. Fun, right?

They each have a different emoji in mind, which meant I made a few different patterns, one for each girl. We will make an alien, a koala, heart eyes, kissy winky face, and stressed (?) face to name a few. Then tomorrow we will get together, sew them up and stuff them. And the girls will go home with their own plushie emoji pillow. 

Since pillows are easy to make, and fun for all ages, I decided to post the pattern for a simple winky-face emoji pillow here, with a quick tutorial on how to put it together. This would make a fun project for a beginning sewer, or anyone really. 

I might have made a poop emoji pillow that I slipped to my sister's husband to place underneath her pillow once......my sister and I send each other that emoji ALL THE TIME. We might be a little on the immature side. Poop. Giggle giggle. It's a happy pile of poop. Snicker....

The pattern I am posting here for free is the winky-face emoji. It will make a 14-inch diameter soft pillow: the perfect size to sit atop a bed or to accessorize a chair. 
This pattern will print on 6 pages of 8.5 x 11-inch paper

You will need:
  • 1/2 yard yellow fleece
  • yellow all-purpose sewing thread, thread to match felt
  • brown, black, or dark gray felt (I use wool-blend felt) for eyes, eyebrows, and mouth **if you don't want to use felt, you can applique cotton fabric onto the fleece instead using applique adhesive paper and then use zig-zag stitch in matching thread around the border of each appliqued piece. 
  • typical sewing notions: pins, scissors **if you don't own a sewing machine, you can also glue the pillow...that will work too. I'll explain that in the tutorial. 

Download the pattern HERE. 

It will print in 6 pages. Each page has cross-marks in the corners for you to line up and tape together. 

If you prefer the pdf file not be broken up, leave a comment below and I will email you the unbroken pdf file. If you open it in Adobe Acrobat, print it under the option "poster" and it will print it for you on separate pages. 

The pattern has 1/2 inch seam allowance. 


Let's Get Started!


1. Pin your pattern pieces (or trace around them) onto your fabrics as outlined in the pattern. You will cut 2 yellow fleece circles, a left oval eye out of felt, a right "winky" eye, the eyebrows, and the mouth all out of felt as well. 

I used all dark brown felt for my pillow

The nice thing about felt is that since it's a pressed fabric, it won't fray, especially if you use really sharp scissors (I use small embroidery scissors). So you don't need to worry about the "unfinished" edges of the felt. They can stay that way. 

2. Place your facial features onto one of the yellow circles (on the "right" side of the fabric). Align them using the pattern as a guide. You can pin in place, or do like me and use some washable glue stick (shhhh...don't tell your mother) to hold the felt pieces in place once you have them where you like. 

Then with matching thread, edge stitch around each felt piece. Go slow around some of those curves if you need to. The eyebrows can be a bit tricky. 

**NO-SEW Method: Alternatively, get yourself some E6000 glue and with small amounts, glue the felt pieces down on the fleece. You may want to use a toothpick to spread the glue evenly over the felt pieces. 

3. Take your second circle of fleece and place it on top of your first piece (now with the face on it), with right sides of the fabrics together. Pin the fabrics in place. Since fleece can slip easily when sewing, I err on the side of using more pins than less.


Now starting at the top of the head, begin sewing (with 1/2 inch seam allowance) around the curve of the circle, sewing the two fleece fabrics together. When you get back up to the top, make sure you stop and leave about a 3-4 inch gap in which to turn the pillow. 

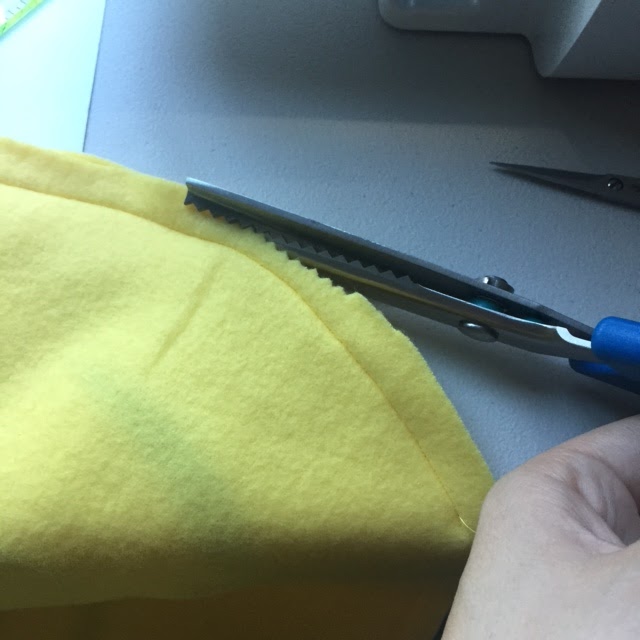
Before you turn the pillow right-side out through the gap you left, make sure you clip the seam allowance so that the pillow lays nicely. You can do this using pinking shears, or with sharp scissors, by cutting lines perpendicular to your sewn line close to (but not through) the stitches. 
using pinking shears to trim seam allowance

if you don't have pinking shears, you can trim the seam with scissors and then make small slits as shown

**NO-SEW Method: place the fleece circles right sides together as mentioned above, but instead of sewing along the edge, glue the pieces together along the very edge (toothpicks will come in handy here again), leaving 3-4 inches unglued to turn and stuff after the glue has dried. Allow glue to dry. 

4. Turn, iron, and stuff! Through the gap you left un-sewn (or un-glued), turn your pillow right-side out and press it with an iron. Since you are ironing polyester and acrylic material, you DO NOT want the iron to be too hot, or you will melt your materials. Have your iron on the lowest setting, and without steam. Pressing the area where the gap is (with the fabric folded as if it had been sewn) will help you in sewing up the pillow by hand to close it.
I don't trim the seam where the gap is so that I have more fabric there to work with when I hand-sew pillow shut

pressing the fabric after pillow has been turned right-side-out


Using poly-fil stuffing, stuff small wads into the pillow through the hole/gap until you get your desired firmness. Pin the top closed and hand-sew--through the fold you pressed earlier-- (using a ladder stitch looks best, but a whipstich will also get the job done) your opening closed. You are done!! See?! Easy peasy!
Pin the opening closed after stuffing, and hand sew it shut


For those using glue, you would just glue your opening shut. That's right; I said glue it shut!

Using this pattern as a guide, you can make pattern pieces for other emoji's now, too. Surround yourself with emoji pillows. Make your own feelings chart using emoji's. Put a poop emoji in your sister's bed. The sky's the limit!

Have fun making pillows! I think they'd make a fun light-hearted Christmas gift. 

**UPDATE: Here are the other pillows we made: